1 Welcome to ayrix
Highlights
The Ayrix is a new communication base integrates latest communication and collaboration technologies. We briefly explain the highlights of our product.
- The design has been revised through the practical use of older systems and its modular structure is based on intuitive user guidance.
- Ayrix has very small footprint on memory and CPU
- Ayrix contains a fully automated upgrading service. That limits your maintenance care extremely
- A simple, integrated licensing system that allows you to order online extensions and track your telephony services.
- The Ayrix is highly configurable by its web interface
- The main menu only contains the most important points for operation and configuration.
- It contains many built-in templates or can simply be duplicated from existing entries.
- No vendor lockin. The Ayrix uses a standard SIP protocol. You can select your SIP terminals from a broad range of suppliers.
- Integrated NAT and STUN support for cloud hosted environments
- The system supports multi-languages
Benefits
- A simplified installation through a disk image enables the installation of the operating system and application in one work step
- The image can be installed on a bare metal or virtual machine of your choice. With a low resource occupation. the Ayrix uses less than 1Gbyte ram and less of 20Gbyte disk space.
- Simple configuration through an intuitive menu overview, while extensive functions are available behind it. The system allows that end users can manage and carry out configuration adjustments themselves.
- Ayrix contains a fully automated upgrading service. That limits your maintenance care extremely. The advantage of Ayrix over its competitors is that the user management and telephone configuration are independent from each other.
- The Ayrix is highly configurable by its build-in web access, configurable for administrator and users, offering to do phone configuration by themselves.
- Security based Intrusion Prevention System (IPS) and Intrusion Detection System (IDS) system as well certificated encryption for web access and phone calls, prevents unwanted access.
- Security by IP black- and white-listing, Geo-Location and Number identification.
IT-Requirements
Recommended System requirements:
An Intel Core server with virtualization software. We recommend VMware, KVM or XEN.
- CPU Family Intel i3 (64 Bit)
- Number of vCPU’s 1
- Memory 1 GB
- Storage 20 GB available storage space,
For higher reliability we recommend a raid Installation, see chapter 16.2).
- Internet connection
For an Ayrix installation you need a virtual server or physical server hardware.
Check out your firewall settings. Open the relevant ports for correct operation. Used ports are listed in the appendix.
Steps to install your own virtual Ayrix
- Go to the website: www.ayrix.ch or www.ayrix.com
- Select on the website your preferred language: German or English
- Navigate to the button” Download”, Click on it, a pop-up window opens.
- This window shows the requirements. Click Download again to get the free ISO disk system installer
- Open your virtualization software. Create a Linux Centos 7 server with minimal requirements or better. Include the Ayrix ISO disk installer and assign a NAT network interface
- Start the virtual machine and follow the installation instructions of Centos. Wait until the configuration screen appears
- Enable/check the general network setting: “Automatically connect to this network when it is available", in “Network & Hostname” settings. Press “Save” and “Done”
- We recommend installing a RAID disk system. For a software RAID installation see chapter 16.2 Raid Configuration
- Set the correct (NTP) Time zone for your country
- Depending on your internet connection and System performance, the installation takes up to 20 minutes. When the installation is almost complete, the Ayrix telephone system will automatically be updated to the latest version over the internet and initialized without any notification on the screen. Be patient
Press “Esc” button to keep track of the loading process*. When finished, the system restarts and the login screen with the IP address of network access appears
Open a web client at your host and enter:
The registration and activation page opens
- If time-out, check your browser security settings: Java Script should be enabled
Fill in the registration form to register your Ayrix PBX. Remember your initial password
A confirmation e-mail including license key and username is returned. Check your mailbox
Now enter or copy your license key in the activation tab. The license validation is limited to 3hrs or 10800 seconds after sending the key request.
After license activation your PBX is ready to login. Login and password are case sensitive
Congratulation! Your Ayrix telephone system is operational and ready for telephony configuration
Important license notice:
Depending on your license bundle, some features may be not present or have limited functionality.
*Reseller customers have a predefined registered license bundle. Skip the registration form and continue with the activation tab (see also License).
Already too much? Contact your Ayrix sales representative! We offer you a high grade, fully managed Ayrix-ready-to-go virtual PBX (SaaS) in the Ayrix-cloud.
It does not matter static or DHCP due installation. After installation you can change your network settings via the web access without losing license. In menu System – Network – Interface.
By pressing the ESC key due the Ayrix download. You should see jobs from /etc/rc.d/rc.local followed up with a number of modules, So you can keep track if the installation is going correctly.
(for example, testPC fails on udev kernel Manager -a device Manager– and ends up with a normal screen without any started services > Failure in Bios settings).
Technical Support
We offer charged support services on the released versions of Ayrix PBX.
The support is at level best effort unless Service level agreements are agreed with a support contract with the supplier or distributor. Contact our customer service at support@ayrix.ch.
On beta releases there is no technical support. In case of a failure sent a bug report form via the bug bounty program on the Ayrix website under: www.ayrix.ch
System configuration guidance
The system configuration depends strongly on the customer individual needs. If you are not confident with telephony configuration and its dependencies, we guide you stepwise through a basic configuration setup.
Minimal requirements:
One (soft-) SIP phone
A SIP Trunk agreement and setup data from your service provider (TSP).
1 Quick Setup Guide
With these 5 STEPS and 2 checks you will get your Ayrix configured and operational.
- Quick system check
- Administrator account completion
- SIP Trunk assignment
- Direct inbound-Dialing (DiDs)
- Extension assignment
- Extension connection
- Testing connection.
1. Quick system check
In front of the main menu titles icons are present. These Icons will appear in different menus when there is a relation between menu items.
Go to the menu Settings > System > Language and Region.
Language, check if your preferable language is active
Time zone check if the NTP clock is set to the right Region to synchronize the local time zone.
E164 settings, set your country dependent dialing rules. See also chapter E164 Numbering scheme explanation.
2. Administrator account completion
Go to the menu Security > User Authorization. > Click on the tab “User”. Select the 1st. line, by default the Administrator. The user data appears in the vertical editor block. Expand the administrator data with the required language, change the administrator password to improve security, and optionally enter his telephone number. Now the application presents itself in the correct language. Leave the other data as is, for the time being. The system indicates with a red line if your password is too weak. You cannot save your entry.
Press “save”.
We strongly advise to add a 2nd administrator entry in case of emergency. Memorize your admin password (-s).
The “Save” action behaves differently depending on the topic you are working on.
3. SIP Trunk assignment
Go to the menu Routing > Trunk > press tab “+ add SIP Trunk”. A pop-up window opens.
Select your country, select your language, and check, if your telephony service provider (TSP) is listed in the template. Select your provider and press "Add".
If your service provider is not listed, enter in the field Service Provider “Default”.
Press. "Add” to assign a new configuration. The window “Configure SIP Trunk” opens.
In the tab basic settings enter a suitable name for your trunk. For example:” Trunk_To_TSP”
Enter in the authentication field, the SIP user ID and password you received from your TSP
Enter the max. number of simultaneous calls. Value “0” means maximum simultaneous calls possible.
The SIP user ID is number. That number does not necessary match with your Caller ID.
Depending on your selection some entries are already filled in. Check and complete the fields according the TSP`s specifications.
Codecs
The codec is the digital conversion of the voice into a data stream. The SIP protocol negotiates the codec to be transmitted between the parties.
Commonly used codecs are: G711a for Europe and Japan, G711u for the USA and G722 for broadband transmission. Read the explanation about codecs in chapter 6.2.2 Codecs
In the window with the basic settings, select "Codecs" in the right vertical configuration area and move the required codecs from the "Available codecs" list to the "Selected codecs" list.
You can rank the codecs by quality. Applicable codecs list should be given by your TSP. If your TSP did not provide you with a list of preferred codecs, move all available codecs to the selected list. The selected codecs are also used for extensions by default.
Tab through the next pages: SIP options, Inbound headers, and Outbound headers. Check and complete the entries according to the configuration data from your TSP. Leave the settings that are not relevant for the time being unchanged.
Press “save” on any page you added or changed entries.
Optionally, you can add a caller ID and regular expression for the called-ID. Regex offers you to change the displayed number of the calling or called subscriber, if this display is not overridden by the extension CID configuration.
Leave these fields empty, for the time being.
Press “save” and press “(<)” to return to the trunk list
In the trunk list you should now note that the activation switch of your trunk is set to "active", and "REGISTERED_ [DAY]" is displayed in the status field.
Congrats again!
If the status shows any other message, check your settings, and correct them. Possibly that your TSP has not yet activated your trunk. Contact your TSP. (see also Trunk Status)
4. Direct inbound Dialing (DiDs)
DiDs addresses your system. DIDs enable incoming calls to be switched through. Depending on the number of trunk lines you have ordered from your TSP, you have received a single number or a number block or number range.
Add the number range exactly as it is specified by your provider, see also Numbering scheme E 614 Explanation.
Select your trunk and press tab DiDs. Assign the number (-block) given by your TSP. and press “save”. Finished!
The "Inbound" window shows the incoming dialing rule list. It shows the relationship between the DID numbers and the destination.
The “Outbound” rules window guides you through a trunk arrangement to the public network.
By assigning the SIP trunk (see step 3. Assigning the SIP trunk), outgoing rules are set autonomously with standard values (= no restrictions). As a result of these standard rules, you can now dial out to the public network without any restrictions.
5. Extensions assignment
Click on "Extensions" and press the tab key "+ New" at the top right. The configuration panel “Basic settings” opens.
Enter the extension number you want to use, first and last name of the user and his e-mail address for e-mail notification.
Assign a user ID and password. A strong password is already suggested. Check the password by pressing the (eye) "ᴑ".
Add a Calling Identifier (CID) number that is being displayed at the called party.
(Optional) Select the DID number you want to assign for direct inbound dialing,
press” save”. A confirmation message “Data Successfully Saved” is displayed
Go to the Tab Advanced Settings
On the right panel, scroll down to the option: Number of Simultaneous channels
Set the value to 2. This enables your extension with the RTP settings immediately.
Press “Save”
(Optional) Go to tab: Codecs:
These codec settings overwrite the selected of the trunk codec list. Move the preferred codecs from the list of available codecs to the list of selected codecs and click "Save".
Return to the list of assigned extensions. Press "(<)".
6. Extension connection
The configuration for a SIP telephone differs depending on the provider and model. Therefore, we can only explain the extension configuration in general. This configuration is similar to the extension configuration in the Ayrix PBX.
We recommend installing a simple softphone directly on your host for testing. For example: an Estos, Groundwire or Bria.
Read the instruction manual of your SIP Telephone carefully. The telephone should be delivered with a loaded firmware.
Plugin the telephone on a POE switch, or with a connected secondary power supply adapter the telephone becomes operational.
(Almost all) Physical SIP phones are configurable via an IP web console. Check out your manual for easy access.
Go to your phone's website or directly into the phone's menu
- Go to Phone Settings> Administrator Settings>
- Set up the network configuration, depending on the network configuration, set the device to DHCP or give it a static IP address.
- check whether you can ping the phone from your host.
Set-up the Phone settings menu: SIP Server Configuration:
- Assign the DNS name or IP address of the Ayrix PBX
Setting up the line configuration:
- Assign a phone line with a friendly name and the same authentication parameters with user ID and password as the assigned extension in the Ayrix PBX.
- UDP is a frequently used protocol for SIP telephony. With the "Transport" option; Select: "Only UDP".
- Save the configuration and return to the main menu on your phone.
- From the Ayrix menu, open the Extensions menu. and refresh the webpage.
- Check whether the point of your assigned extension has changed from red to green. (= Phone registered).
Your phone is now ready for use. Well done!
7. Testing connection
You have now completed the basic configuration. Test your telephone connection. You should be able to make and receive calls using your assigned trunk.
Resume Ayrix Set-up.
We guided you through the installation and basic configuration of the Ayrix PBX. To keep the setup simple, less relevant fields have not been described.
In the next chapters we fully describe all fields, settings, and functions.
Too much for you? Do not hesitate to call your Ayrix representative.
We offer hosted Ayrix and expert on-site installation service.
Housekeeping: After assigning and saving data of, extensions, queue, ring group or speed. Dialing codes, the (demo) Ayrix does not immediately take over the entered values into the running process. Other functions do.
This might take up to several minutes up to an hour (failure? or dependencies?)
For example, to speed up activating the RTP codec stream on the extensions I edited in the tab advanced settings the channel. By pressing save the RTP codecs where immediately switched on.
2 Dashboard
The dashboard shows an overview of the system status, about:
- memory usage, disk occupation and CPU load of your server
- the number of active calls and call duration
- An overview of the call waiting times of the queues, as well as the selection per queue
- The number of incoming blocked calls by IP addresses in time, caught by the blacklist of the BruteForce Protection module
- the PBX system services, indicated with h a blue (informative) green operational), yellow and red (not operational) status
- Information about the systems configuration, as internal network IP, External (gateway) IP address
- The actual Ayrix PBX software version
- The maximum number of licensed extensions
- The time zone, for calendar usage
It is strongly advised to allow all system users at least read access to the dashboard (see also User Authorization)
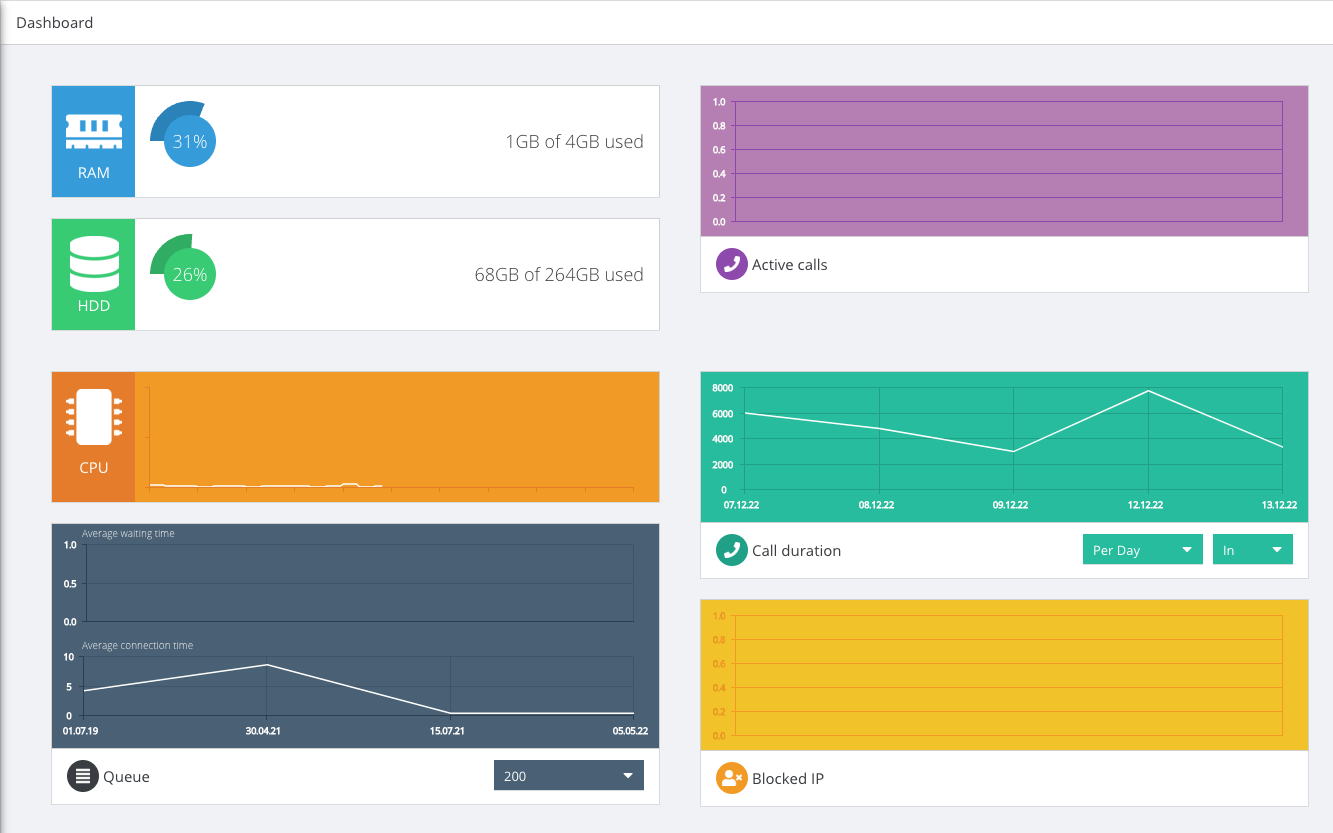
For example, the block “CPU load” update line, other fields (information and status block) are not being modified. They become blank, Web is a stateless protocol, just manual a screen refresh overcomes that.
If read/write /delete of the dashboard is disabled, the user immediately gets an error message on opening the web page. That not nice, as you cannot click it away.
3 Extensions
Extension configuration is the main feature of any telephone system. The Extension module allows the user to add and configure Phone terminals on the Ayrix. Each extension connected to the PBX system and has a number.
Extension calls can be made within the company without incurring any costs.
The assigned extensions are listed in the extension window. It has three tabs: “Add”, “Edit”, and “Duplicate”.
You can use the search bar to view a search term to search by first name, last name, or distance. The search term is not between uppercase and lowercase letters.
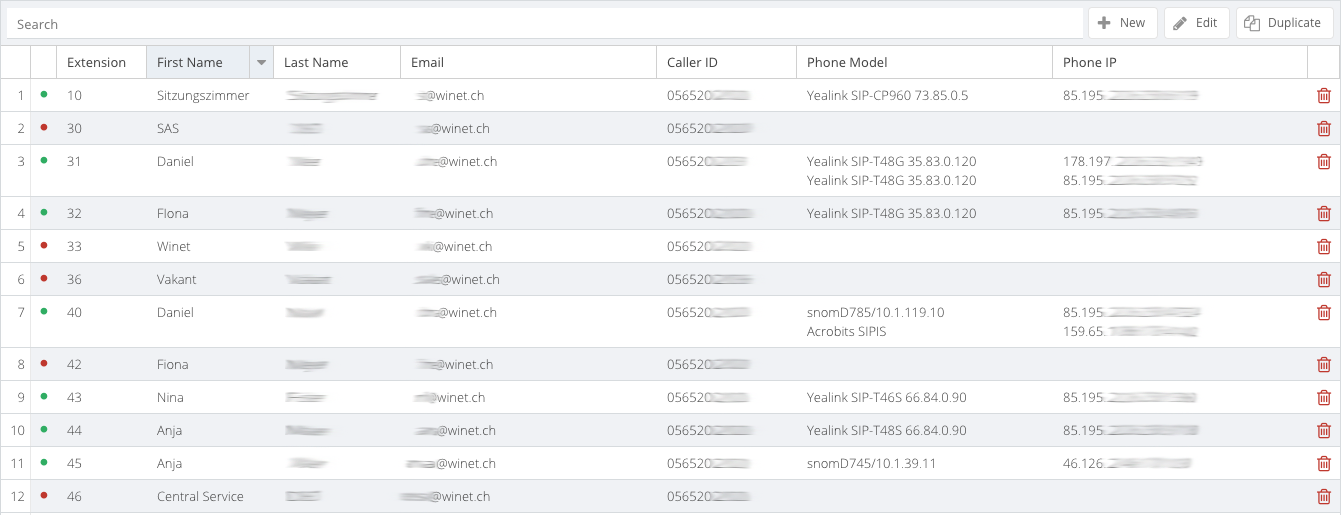
The extension window provides an overview of the availability of a user in the form of a green dot, or in case of unavailability, a red dot. Further the name and the first name, the e-mail address and the assigned phone number. Under Phone Model the currently registered phones as well as the corresponding IP address and the port can be seen.
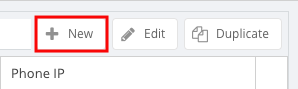
Adding a new Extension
To add a new Extension, click the "New"-button to display the “Basic Settings”
- Enter a unique extension number and fill out the required user information
- Enter an Authentication ID and a password, that are required to register a SIP phone or softphone client
- Enter a CID ("Caller ID") for this extension number
- Enter an e-mail address for e-mail messages
- Optional: Add any DID number for inbound calling.
- Click the "Save"-button
CID
The "CID" is the number that will be displayed to the called party. This CID field only accepts numbers.
Other CID entries in the Ayrix with “prefix” field also accept alphabetic characters. With this prefix you can create a name-number display, for example: "HELP800".
DID
The Direct Inbound Dialing (DID) number allows an extension to be reached directly from outside the PBX.
Editing an existing Extension
To edit an existing extension, click on the Line and then click the "Edit"-button to display the configuration or double klick the entry in the list of extensions
- Change the Information you would like to modify
- Once ready click the "Save"-button
- Return to the list panel by pressing (<) in the top right
| Field Description | |
|---|---|
| User information | |
| Extension | The extension number [1..9], max. length 10 digits, leading zero and characters are not allowed], mandatory field. Extension number presentation can be extended by the CID Regex in the Advanced Settings. |
| First Name | First name of the terminal owner, mandatory |
| Last Name | Last Name of the terminal owner mandatory |
| E-mail address for extension related e-mails, voicemail Conferences e.g., Mandatory field | |
| Authentication | |
| ID | The registration name to identify the Terminal. The name must match on PBX and terminal. Mandatory For security reasons choose a complex and/or long name |
| Password | A password that matches with the terminal password. A predefined password will be presented and can be overwritten. For security reasons choose a complex and/or long password. Mandatory |
| CID/DID | |
| CID | Caller IDentification: the number shown to the caller, mandatory [max. 20 Digits] |
| DID (optional) | Direct Inward Dialing number. Access number to reach your extension. DIDs are defined in: Routing-> inbound. [max. 10 digits] |
Mandatory fields need data entries to save the record. A red line is shown if missing or wrongly written.
3.3 Extension features

To add extension features, select an Extension and click the "Edit"-button. There are nine tabs on the top of the screen.
- Calendar
- Voicemail
- Forwarding
- Extension Routing
- Follow me
- Geo CID
- Advanced Settings
- Codecs
Extension features are described in the next paragraphs:
3.3.1 Calendar
The Calendar feature allows users to link to an external calendar to setup a calendar-based calling behavior. That calendar is synchronized.
Supported calendars are:
- Microsoft Exchange Web Service Calendar
- Microsoft Exchange calendar
- CalDAV calendar
- iCal calendar
Destination if appointment
The "destination at appointment" determines the forwarding rule for incoming and internal calls. If there is an appointment entry in the calendar, calls are routed to the destination. If no forwarding is set, an absence tone is given. The Calendar distinct between sub-status 0=Free, 1=Tentative, 2=Busy.
| Add calendar | |
| Name | Unique name of the defined calendar |
| Type | Choose the type of calendar |
| Calendar URL | Enter the URL where to find the calendar to check for events. Support for HTTP redirect is currently not implemented. It is therefore important to enter the full URL and pay attention to the required slashes. |
| Username | Username for accessing the calendar. |
| Password | Password for accessing the calendar. |
| Refresh time | The period in minutes between each calendar data synchronization. |
| Timeframe | The time span in minutes of the calendar that is covered by the synchronization. |
| Notification | |
| Enable notification | Selects if a notification call to the user should be executed. |
| Minutes before event notification auto reminder | The amount of time, in minutes, that Ayrix will notify the user before a calendar event occurs. The user is notified of the appointment by an automated call with a voice message. If set to 0, the notification is disabled. |
| Destination if appointment | |
| Destination | Select from the list the possible destinations. |
3.3.2 Voicemail
Voicemail is used for recording an audio message when the called party is not available. To do so, the user Interface Voicemail offers to configure the voicemail feature, as well to manage and listen to the recorded messages.
Voice mail messages can be listened by phone or sent by e-mail as a .wav file attachment.
A second way to manage voicemail features is accessing your voicemail box by dialing your own number.
A third method accessing the voicemail box remotely by dialing the destination, wait for the greeting message and dial “*” followed by the pin code.
The Voicemail announcement language is by default English. Set your preferred language in tab “Advanced Settings” – “Language”.
The window contains a configuration panel on the left and the Voicemail administration panel on the right.
| Action | |
|---|---|
| Enable Voicemail | Activate or deactivate the Voicemail function for the extension. |
| Basic Settings | |
| Timeout | The time limit in seconds before the incoming call is forwarded to voicemail box, if there is no answer AND no other forwarding’s are active. For ex. extension routing. |
| PIN | A PIN code number to save the voicemail settings The PIN is mandatory to save the record. |
| Voicemail if busy | Activate or deactivate call forwarding on busy extension |
| Manage Greetings | Remark: To activate a next greeting message, delete the first message, then select the new Message and press save to activate. |
| Manage Greetings | Individual user-based announcement recordings |
| Announcement when busy | Activate or deactivate voicemailbox on busy extension |
| Announcement while not available | Announcement when your phone is not answered, disconnected or de-registered |
| Temporary announcement | Temporary announcements. A temporary announcement has the highest priority. If set, it overrules all regular announcements |
| Name Announcement | To create a voicemail welcome greeting with your name |
| Advanced Settings | |
| Number of messages | Shows the maximum number of new voicemails that will be saved in the list of new voicemails. |
| Delete after send: | Choose whether message recordings should be deleted after sending or downloading. |
| Delete oldest messages | Erase the last message from the new voicemail list. |
| Send attachment | Send voicemail messages as e-mail attachment (*WAV). |
| Play messages | Enable to play messages of the new and old voicemail list |
| Read out number | Speaks the message number prior to the voicemail message |
| Announce date and time: | Speaks the date and time before the voicemail message |
| Options for caller | |
| Confirm voicemail | The caller can confirm if his recording is correct or wants to be re-recorded. |
The first two folders can be managed on Ayrix in the administration window.
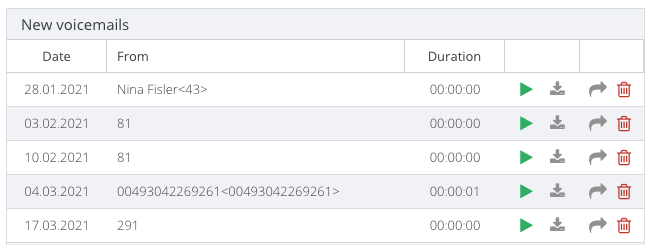
| Field Description | |
|---|---|
| New voicemails | The list of incoming voicemails, able to play, send or delete. When the voicemail is played or send, the voicemail is moved to the old message list, or being deleted when option “Delete after send” is set. |
| Old voicemails | The list of archived voicemails, able to play, send or delete |
| Voicemail list Panel | |
|---|---|
 |  |
| play download move | Play download delete |
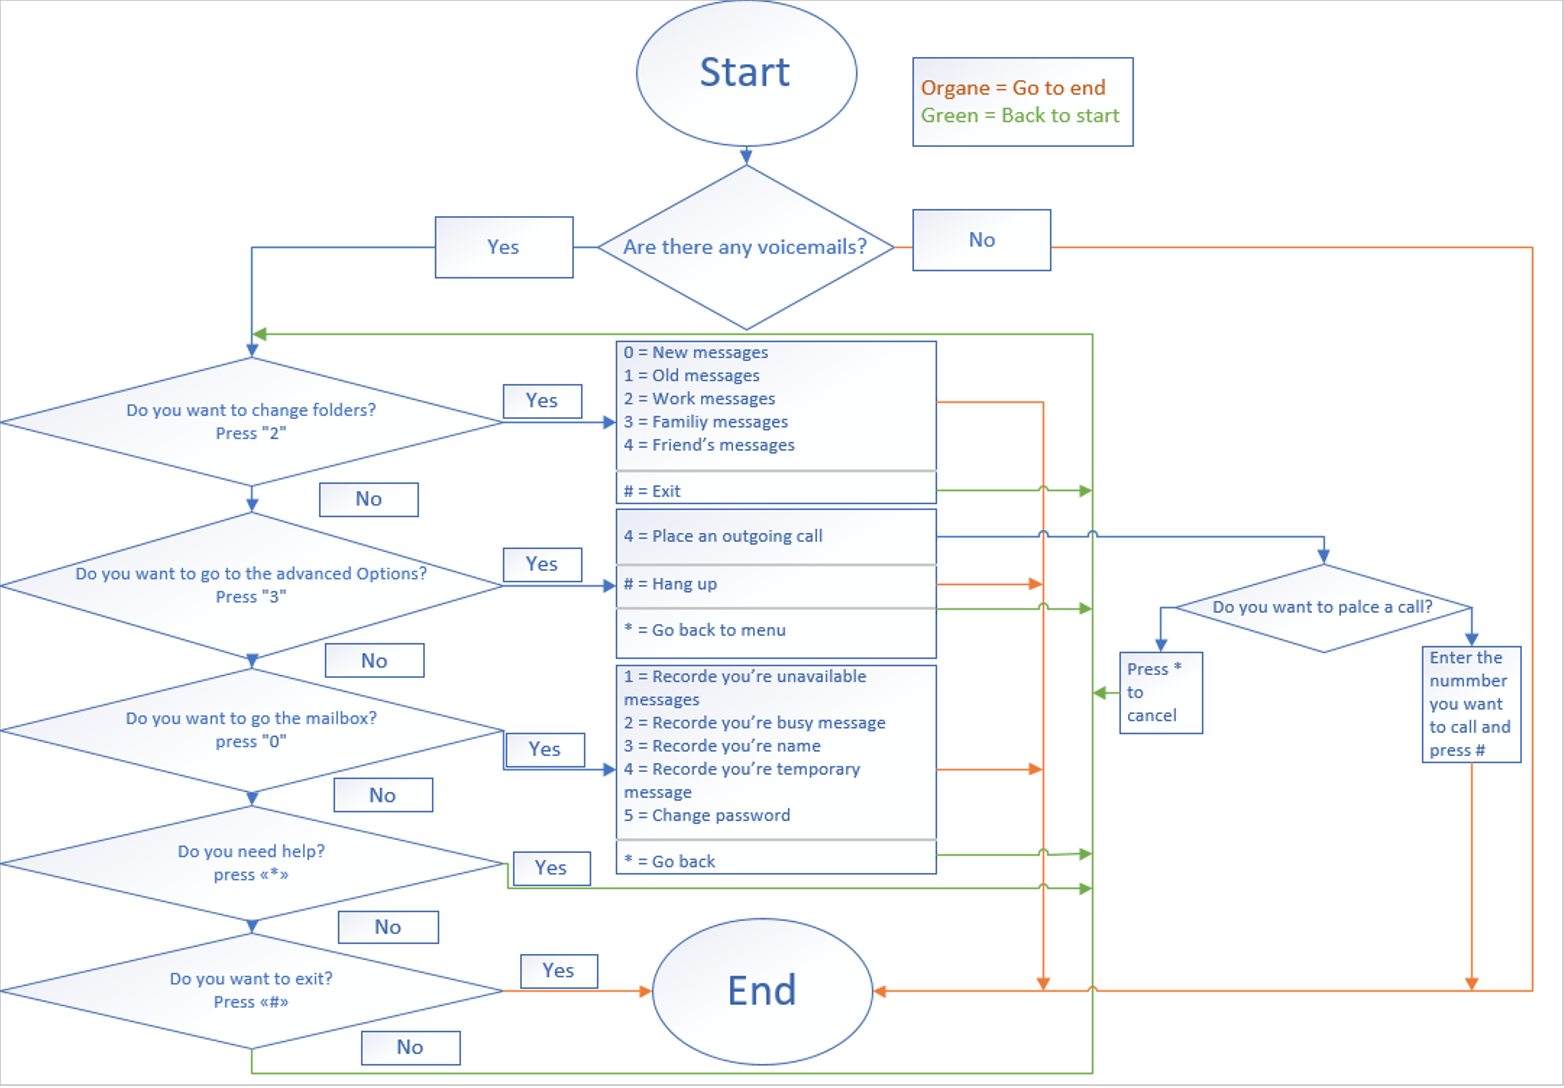
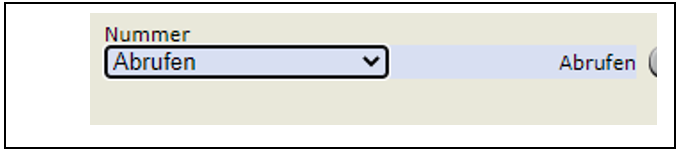
Voicemail terminal menu guidance
Dial your own extension number on your phone to listen to your voicemails.
You have two options how to listen your voicemails.
The first option is that you dial the number. The voicemail replies about stored voicemails, after you are guided through a navigation menu to handle them.
The second option is that you dial remotely to the destination, when the voicemail starts you interrupt by pressing “*” and enter the Pin (password).
The terminal menu guidance offers you to record and activate new messages on the phone.
These recorded messages are not! visible on the Ayrix “Voicemail”.web page..
Fig. Call flow Voicemail
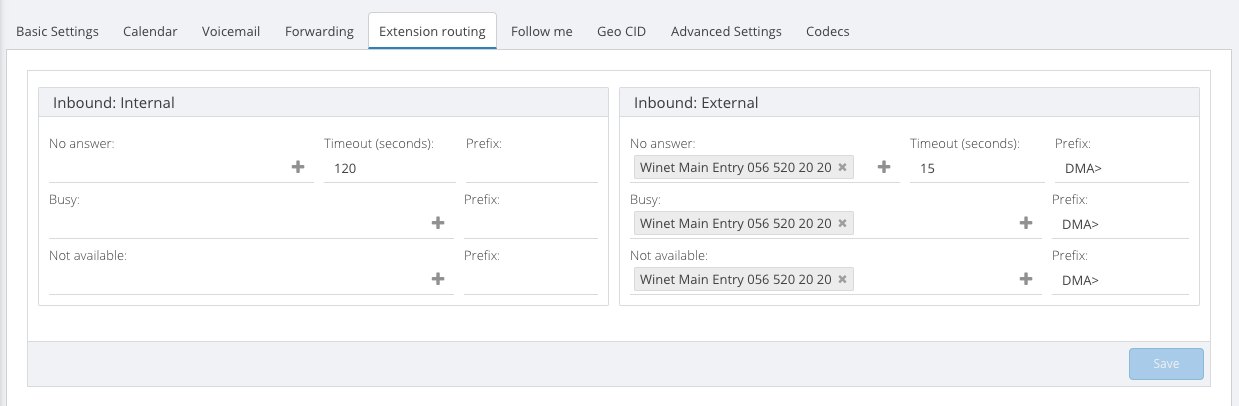
3.3.3 Extension Routing
The extension routing module allows you to forward calls in specific states of the extension. The destination can be an alternative destination, a voice mail, an announcement, or just busy tone. Ayrix distinguishes between internal call forwarding and external call forwarding. In this window you configure call forwarding for those specific statuses.
| Field description | |
|---|---|
| Inbound: Internal | Forward to destinations for internal calls |
| No Answer | Forwarding on no answer due ring time-out (in seconds) to the prefix number. |
| Busy | Immediate forwarding to prefix number when you are busy on the telephone and the maximum channels has been reached (the caller will be queued) |
| Not available | Immediate forwarding when the telephone is switched absent, in do-not-disturb mode, not registered, or not connected. |
| Timeout | The time-out in seconds before the incoming call is forwarded to the defined destination. |
| Prefix | The prefix number that points to the destination. |
| Inbound: External | Forwarding to destination for inbound calls |
| No Answer | Forwarding of an inbound call on no answer due ring time-out (in seconds) to the prefix number. |
| Busy | Immediate forwarding of the inbound call to the prefix number when you are busy on the phone, and the maximum channel occupation has been reached (the caller will be queued) |
| Not available | Immediate forwarding when the telephone is switched absent, in do-not-disturb mode not registered or not connected. |
| Time-out | The time-out in seconds before the inbound call is forwarded to the defined destination. |
| Prefix | The prefix number that points to the destination. |
| Outbounds | The list of outbound routing tables |
| +New | Add a new routing entry |
| Edit | Edit an entry in the config panel |
| Duplicate | Duplicate an entry as a basis for a new outgoing rule |
| Pattern | Enter the part of the trunk access number that differentiates between routes |
| Prefix | The prefix number that points to the destination. |
| Strip | Strip a (sequence of) digit(s) from the route pattern |
| Outbounds | |
| Trunk sequence | Accept: Block: Default: |
| CID | Depending on the route, display a CID, e.g. For example, with a "company internal dialing" you only want to show the caller the internal extension number instead of the public caller ID. |
3.3.4 Outbounds
Not only for inbound, but also for outbound routing we can configure extension-based routing rules. For example: A “priority or emergency trunk. Only available for the CEO or chief officer. Whenever the first trunk is occupied or blocked, he can dial out over a 2nd priority trunk.
“Outbounds” extension routing rules have priority over the general Outbound routing rules, (See chapter Outbound).
This Outbound panel is to configure an outbound routing table per Extension.
In that table you can reconfigure a dialing digit numbers that are sent over a trunk by adding or stripping digits from the dialed pattern.
For example: anyone dials a number including country code in the own country and your provider only accepts national numbers in the country. A digit string of “00-41-56-520-xxxx” is sent. On the pattern “4156” we strip the country code for Switzerland “41”. Because of the country settings for national numbers a leading zero is placed. So finally, 056xxxxx is sent., see System Language & Region.
Or in case you want to select on a specific trunk, for Least Cost Routing (LCR) or “In-company” dialing.
Creating outbound rules, based on the dialed digits, you can select a particular trunk due dialing.
For example, on 00-4156-520-xxx (Switzerland) you select Trunk 1, on 00-31-26-311-xxxx you select trunk 2 (Netherlands).
We need to define a trunk access code to distinct between the trunks.
For example, selecting trunk 0 will we need a digit “8”, selecting Trunk 2 we need a digit “9” We add a prefix in front or our Pattern. “4156” we add a prefix “8” and for “3126” we add a prefix “9”.
3.3.5 Follow-me
 With the Follow-me function, the user can create a ring group for his own extension (i.e., fixed and mobile numbers). A forwarded call will ring on all these destinations. The forwarding is active on all incoming channels.
The difference between a ring group and Follow me is, when a call is being answered on an internal destination, the originated extension is also occupied. In a ring group the originated number is free. An exaptation is, when the incoming call is answered by a mobile extension, the originated extension is still free and does not go into busy state.
The user can add extensions to the Follow me group by clicking the "New"-button.
You can add external destinations, by selecting from the external number list, and enter the number in the right lower corner of the selecting panel. Enter your external number (including trunk access codes) and press “OK”
Field description
| Destination | The list panel of destinations (multiple possible) |
| New | Opens the selector list of extension or external number |
3.3.6 Geo CID
Geo CID allows an Extension user to send a country-specific Caller ID, depending on the E164 country and region settings. The Ayrix is limited to one (“1”) Geo CID table. This Geo CID allowance list can be configured in the menu PBX > Geo CID. This feature is useful where your company has branch offices in different countries or regions and want to serve your customers from headquarters. Per extension, this list can be either enabled or disabled.
| Field description | |
|---|---|
| Activate GEO CID | Selects if a Country/Region dependent Caller ID is sent to the opposite party. |
| Enable Geo CID | Enables / disables Geo -CID caller indication. |
| Configure CIDs | The list to configure country/Region specific Geo CIDs. The Geo-CID rules are shown. Configured in the PBX Geo CID rule configuration panel. Now add the specific CID. |
Important Notice: Be aware, Ayrix has different! Geographical based functions:
- Geo CID: Send a country/region specific Caller ID (CID)
- Geo Restrictions: Restrict incoming and/or outgoing calls with specific Caller- ID/Calling ID.
3.3.7 Advanced Settings
This feature allows the user to enter additional settings for his extension.
| Field description | |
|---|---|
| Advanced Settings | |
| NAT | NAT: Default -enables Ayrix STUN -stunning server. Depending on the IP address the SIP messages are passed directly to the Ayrix or it is passed to the STUN server. *see chapter NAT: explanation No: switch off the STUN server. The SIP header is not modified, used in case of Ayrix and Extensions are in the same IP subnet. For. Ex: Ayrix ISO is directly installed on hardware. Force: forces the full SIP signaling traffic passing the STUN server. |
| Directmedia | Directmedia enforce media streaming via P2P No: RTP media stream passes the PBX Yes: Enforce RTP media stream P2P No NAT: send RTP media stream P2P only in the same subnet Update: send an update Element to switch over from PBX to P2P |
| Music on Hold | Selects type of MoH, selecting a Sound File or Radio Stream. |
| DTMF Mode* | See chapter DTMF Mode |
| Language | Select the Language for voicemail and country specific media, ringtones e.g. based on the individual extension. |
| Type | Specify the call direction. Default: Friend The following table shows the respective functions: Ayrix <= user Only outgoing calls possible. Ayrix => peer Only incoming calls possible. Ayrix <=> Friend, both way traffic. A peer can only be called, a user can only call, and a friend can do both. The opposite party gets a disconnected, E503 Service unavailable (-tone), or when voicemail is enabled on the extension, the calling/called party receives an “Unavailable” message, and the caller can leave a message. (normal call completion). |
| Recording | [Yes/No] Record your phone calls when set to “Yes”. |
| Member of pickup group(s) | Add the extension to a pickup group, getting member of it. You can pick up calls from other members by pressing [*8] and going off hook. Multiple group membership is possible. |
| ACCEPTOR_GROUP | A Member of an acceptor group can pick up calls from your extension, even you are not member in that specific acceptor group. |
| Video Support | Select if your extension supports video calls |
| Text support | Select if your extension supports text messaging on the phone display. |
| Header 1 | A 1st text header template to send additional text messages. [max. 50 characters] |
| Header 2 | A 2nd text header template to send additional text messages. [max. 50 characters] |
| Maximum incoming lines | Limit the maximum incoming lines [1...99], on your extension number. If you select more as one (“1”) line when a 2nd incoming call, a call waiting tone is sent to the called party. If the maximum lines are occupied the next caller gets busy tone. Default is set to “1” line. |
| Number of simultaneous channels | Limit the maximum channels [1...99], used for incoming and! outgoing calls simultaneously. For example: series calls. Make calls while a 1st, a 2nd, 3rd called party is parked. When the maximum of channels exceeds, a display message is shown |
| Deny registrations from IP / Network | Blacklist IP address or IP range to prevent telephone registrations on this extension nr. |
| Allow registrations from IP / Network | Whitelist IP address or IP range to allow only telephone registrations with that IP -range this extension nr. |
| Deny calls from IP /Network | Blacklist to prevent phone calls from this IP address or IP range on this extension nr. |
| Allow Calls from IP / Network | Whitelist to allow only phone calls from this IP or IP range on this extension.nr. |
NAT: Explanation
If the caller is in a private subnet behind a NAT gateway, the "Invite" request contains multiple private IP addresses (Listing 2) that cannot be reached by the other side.
The gateway, which carries out the address translation on layer 3 (IP) or on layers 3 and 4 (TCP / UDP, NAPT: Network Address Port Translation) in the packets, is inherently unable to handle IP addresses in higher layers to recognize and modify, but a STUN, -stunning is server is capable to translate these SIP IP addresses from private into public.
The Ayrix can be installed as virtual machine, the Ayrix does have a “build-in” STUN server for this operation. See also System - Network – tab Connectivity.
DTMF Mode
SIP offers multiple methods to transmit Dual Tone Multi Frequency (DTMF) tones to the opposite party during the call. The DTMF Mode selects the protocol of digit- transmission during a call. These DTMF tones can be detected by the IVR or a contact center at the opposite site.
Digits can be transmitted as in-band (tones) in the media stream, that you will hear, or transmitted as Info- or short info element, in the SIP message, (outside the speech channel, you will not hear anything).
| DTMF mode |
|---|
| RFC 2833: in band DTMF tones Info, DTMF send outbound as SIP message protocol Short Info, DTMF send as outbound short-info element in the SIP protocol Auto: depending on the offered services at the called party site, the system selects the appropriate mode |
*Notice: being interoperable sending DTMF, both sites, the Ayrix as well the SIP terminal needs to be configured correctly.
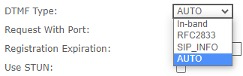
Example: Basic settings of DTMF on a Grandstream G2515:
See also Section: SIP terminal features
3.3.8 Codecs
To get a transmission of your voice, the telephone needs to convert your voice into a Media stream or RTP.
Due call setup the SIP protocol negotiates about the codec to be used between the parties. The first codec that matches on both sides is chosen. Through the years several codec flavors have been developed. If you assigned a SIP trunk on with a Codec selection, already on beforehand the extensions got already that default codec selection available. However, for every Extension you can create a preferred Codec selection. The codec window shows a “Available Codecs” list and a “Selected Codecs” list. You can move and rank your selection from the available to the selected list.
| Codecs | |
|---|---|
| Selected Codes | The selected and ranked list of codecs for Extension |
| Available Codecs | The list of available Codecs |
3.4 SIP terminal features
In conjunction with the Ayrix you will use telephones, more precisely SIP terminals to call or being called. Nowadays SIP terminals have many phone features to make call handling easier. Many functions of the Ayrix are combined with the SIP terminal. We give you a brief overview how to program function keys.
Attention: We describe the functions in general terms. The availability and use of function keys depend on the terminal manufacturer, type and model.
Probably your terminal is so feature rich, that it has much more as the Ayrix offers. We limit our description of these SIP terminal features to the most relevant to assist you to get these functions operational. For a detailed description check your manual and visit the manufacturers website for further explanation.
3.4.1 Function Keys
Many terminals have function keys. We describe in general terms features that can be programmed under a function key.
- Busy Lamp Field & Call Pickup
- Day / Night BLF
- DTMF Mode
- Forward
- Intercom button assignment
- Line registration
- Multiline /channel registration
- Pool & Park + Orbit
- Voicemail indicator
3.4.2 Busy Lamp Field & Call pickup.
Depending on the telephone features a Busy Lamp Field (BLF) can be assigned. BLF is a lamp indicator of another ringing terminal. A call pickup is a 2^(nd) function. A fixed Feature Code for call pickup is *8. On some terminals BLF and Call Pickup are combined, so that you can take over a call of a colleague with a single button.
Example BLF:

Example Pickup/BLF on SNOM715
3.4.3 Day / Night BLF button assignment
Depending on the telephone features a Busy Lamp Field (BLF) can be assigned. A named extension is added due assignment, for example. “dnLamp_1”. That [name] is the reference at sip: [name]@IP_address_or_FQDN on BLF button assignment.
De-/activating by pressing the button switches the Day / Night lamp status at the webpage. The lamp switches from red to green. At the SIP terminal (SNOM715), the status change is announced and the lamp lights-up shortly on (de-) activation.
Example:
Day/ Night assignment on the 2^(nd). (BLF) button on a SNOM715 Telephone set.

<sip:dnLamp_1@demo.ayrix.ch;user=phone>
3.4.4 DTMF mode
About the different Dual Tone Multiple Frequency (DTMF) modes we described already in the chapter Extension-Advanced Settings. (Chapter 3.3.7)
First you configure the correct mode to use the right DTMF mode.
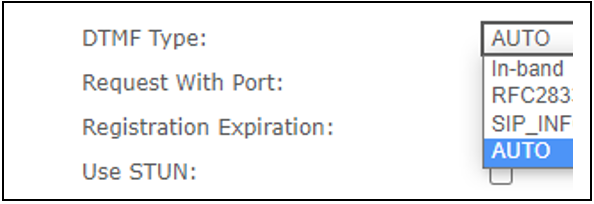
*Notice: Whenever your choice of DTMF tape, In-In-band, RFC2833 or SIP_INFO element, both sites, Phone and PBX, need to accept that mode. Example: Basic settings of DTMF on a SNOM D315: Identity “Number” --> SIP --> DTMF via SIP INFO --> on --> Apply
DTMF Function Key
Second, it’s very handy, if you call a Contact Centre, that leads you through an IVR call flow, by dialing DTMF digits, as is present in the Ayrix, (see chapter IVR) - to create a function key to enable/disable DTMF tone sending.
3.4.5 Forward Button
One of the most wanted features: setting a forwarding, but which code? – A Follow-me button helps you, by pressing a function button, indicating that your incoming calls are being forwarded or not. You could also configure a Day/Night (Chapter 3.4.3) and use this as a “follow me” function.

3.4.6 Intercom button assignment
If you want to user intercom on the Ayrix, the terminals must also support the intercom feature. Check your feature list of your telephones.
Example intercom receiving.
SNOM 785 advanced configuration settings for intercom receiving.
Example: line key settings for intercom sending.
Intercom: setup or disconnect an intercom connection.
Push2Talk: Establish the connection as long the Push2Talk key is pressed.
3.4.7 Line registration
Generally, your phone subscription is registered on a single registrar. Ayrix might just the only registrar of your company. SIP phones are capable subscribe to multiple registrars. The Line registration button helps you to select the number to use.
For example: In a case where 2 users want to use the same terminal but have a different registration:

3.4.8 Multiline / Multi channel registration
Common in the extension assignment is that you create a single subscription on a single line.
On the Ayrix in the tab “Advanced settings” you can extend, “Maximum incoming lines” and/or “maximum simultaneous channels”. See chapter “Extensions -> Advanced settings”.

3.4.9 Voicemail indicator
On the terminal you can enable voicemail indicators. If a new voicemail message has been recorded due your absence, there are two (“2”) indicators, to inform that you received a new message. MWI = Message-waiting Indicator
- By dial tone: lifting the handset, you get a shuttered dial tone on MWI. Intend for non-display extensions as analogue phones used with a SIP converter
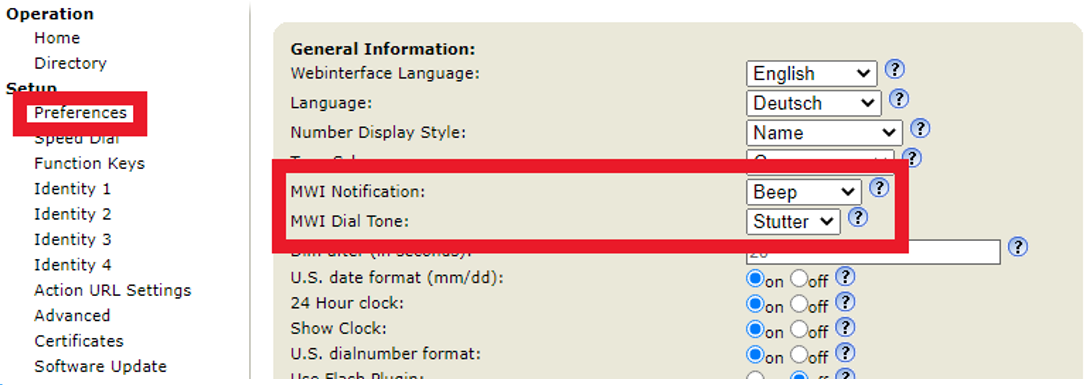
- By a lamp indicator: A voicemail lamp can be programmed at the terminal to indicate the new message.
Example: SNOM 715, separate voicemail button/lamp. It lights up when new voicemail message is received.
4 Provisioning
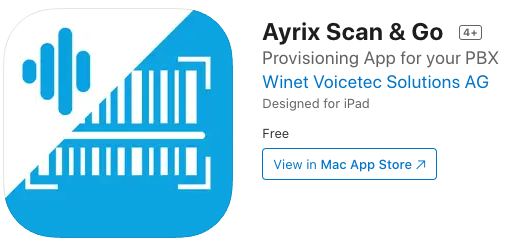
4.1 Ayrix Scan & Go App
With the Ayrix Scan & Go App you can profision Snom phones with on touch.
Configure the Ayrix PBX and with all extensions.
Download and install the Ayrix Scan & Go app from the Apple App Store or Google Play Store. Please note that the device must have a camera.
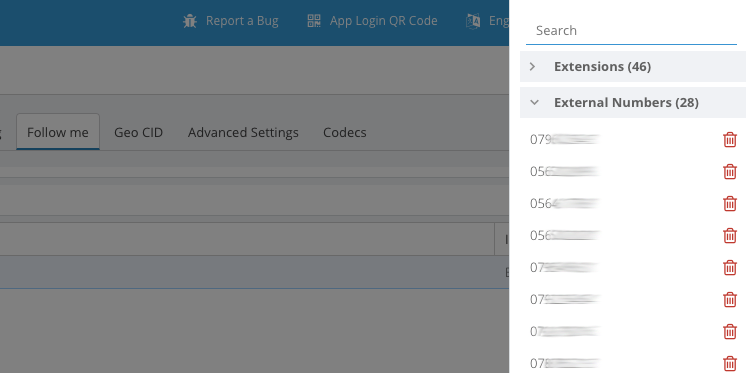
Klick the "App Login QR Code" Button
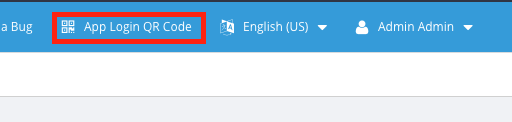 A small window with a QR Code will open. Scan this Code wit the Ayrix Scan & Go App. Your Mobile Device is not coupled with the Ayrix and will show you all the Extensions available on the Ayrix.
Scan the Mac address on the packaging of a Snom phone with the Ayrix Scan & Go app and then assign it to an extension on the mobile phone in the Ayrix Scan & Go app.

You have now successfully connected the phone to the Ayrix.
Unpack the phone and connect it to the network. The phone will now automatically get the desired configuration from the Ayrix.
Provisioning is the feature to provision terminals with the latest firmware and configuration files. Normally every terminals-ethernet interface has an unique MAC address, like [08:00:8c:2a:00:ab]. That MAC is manufacturer specific. The firmware and Configuration file is combined in a template. Depending on the availability of the terminal type, templates can be downloaded form a provisioning server or uploaded from a local pc.
With the next menu options “4.1 Template” and “4.2 Phone” we create that relationship between MAC address and firmware template.
To send a provisioning request to the manufacturer, the Ayrix and firewall and/or router need a opened firmware provisioning IP-port. See Appendix: Firewall port list.
4.2 Template
The Template menu offers to create terminal-model specific template. A number of prepared templates can be downloaded or uploaded from the local PC. On the template window the left site three tabs are available, +New, Edit, Duplicate.
Field description
| Manufacturer | |
|---|---|
| Model | |
| Template name | |
| Install from repository | |
| Upload Phone Template | |
| Manufacturer | |
| Model | |
| name | |
| File | |
| browse | |
| upload |
4.3 Phone
The phone menu offers to create the relationship between created template with the MAC address of your terminal, as written in chapter 4.1.
Field description
| Configure Phone | |
|---|---|
| Description: | |
| MAC-address: | a 12-digit hexadecimal address, split by dot, colon or dash |
| Template Phone | |
|---|---|
| Manufacturer: | |
| Model: | |
| Template: |
5 Callflow
The menu Callflow offers you to configure call routing features. The following features are described:
- IVR
- Queue
- Ring group
- time condition
- conference
- Intercom
- Hold
5.1 IVR
The Interactive Voice Response (IVR) feature allows the PBX to interact with the callers using voice recorded messages and DTMF tones input via the calling device keypad.
5.1.1 Creating a new IVR
To add a new IVR click the "New"-button to display the form
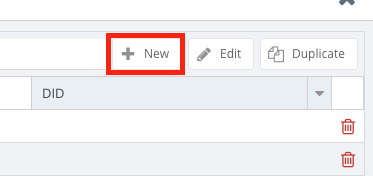
- Enter a name and a timeout
- Optional: Add any DID numbers
- Click the "Save"-button to add the IVR
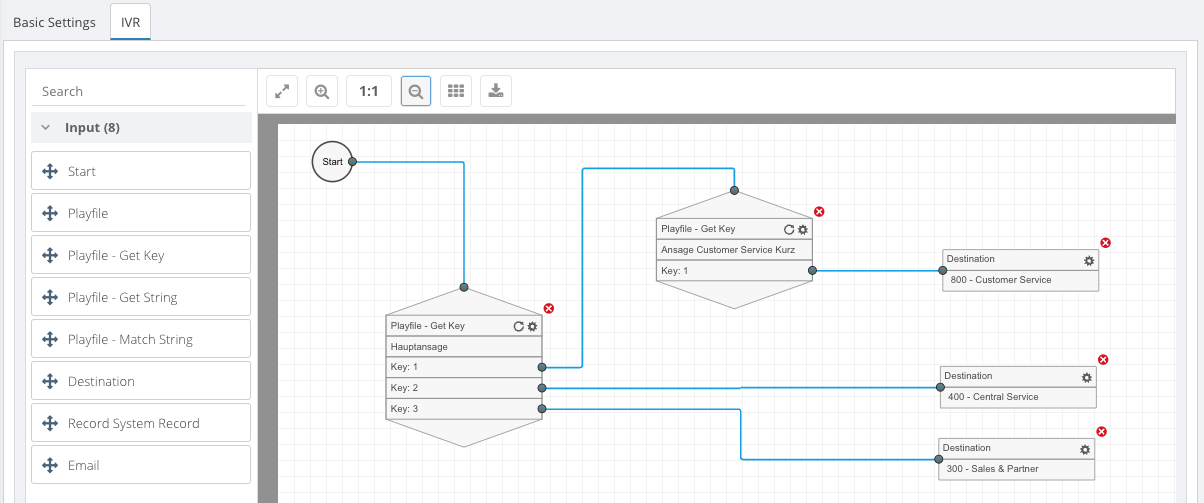
5.1.2 Drawing the IVR
To draw the IVR click on the "Edit"-button to display the form and go to the "IVR" tab to display the drawing board of the IVR.
- Simply Drag & Drop the elements needed from the list on the left into the drawing grid to add them to the IVR.
- To connect two elements simply click and draw the blue points at the edges of the elements to one another.
- To configure the element, click on the gear-icon to open the settings dialog
- To loop an element, click on the loop-icon. An active loop is shown with a green loop-icon
- To delete an element, click on the red cross-icon
| Field description | |
|---|---|
| Timeout | The time-out (in seconds) defines the timespan until the call will be hanged up if no next element is defined, no input is given or when no loop is selected. When loop is selected it defines the timespan until the element will be looped. The timeout time will be always prioritized over the duration of the announcement played. |
| Announcement | The audio file that will be played at the start of the element. An announcement is always necessary when an input is requested. |
| Skip announcement when key/string is confirmed by pressing “#” | When the skip option is not checked, any input from the caller will be only accepted after the announcement has finished. When checked the input can be made during the announcement and must be confirmed by pressing "#". In general, all input should be confirmed by pressing "#". |
| Loop | When active the element will repeat itself until a correct input is given or the caller ends the call. The loop timespan is defined by the timeout not the announcement length. |
5.1.3 IVR elements
Start
The element "Start" defines the starting point of the IVR. A call routed to this IVR by DID or other processing will start at this point.
PlayFile
The element "PlayFile" plays a selected announcement and then optional routes to the next element.
Get Key
The element "Get Key" expects a key (0-9) as input to route to one or more different elements. Minimum one input key is required to route to the next element. A key is a single digit input from the caller device.
- To add a key, click the gear-icon to open the settings dialog
- Enter a timeout and select an announcement that will be played when the caller reaches this element,
- Select a key from the dropdown at the bottom of the window and optional add a comment
- Click the "Add"-button to add the key-match
- Click "OK" to close the window
Now the element shows one or more keys, depending on the number which has been added, with a blue point at the edge which now can be connected and routed to new elements.
Get String
The element "Get String" expects a number string as input, for example "1234", to route to one or more different elements. Minimum one input string is required to route to the next element. A string is a multiple digit input from the caller device.
- To add a string click the gear-icon to open the settings dialog
- Enter a timeout and select an announcement that will be played when the caller reaches this element,
- Enter a string at the bottom of the window and optional add a comment
- Click the "Add"-button to add the string-match
- Click "OK" to close the window
Now the element shows one or more strings, depending on the number which has been added, with a blue point at the edge which now can be connected and routed to new elements.
Match String
The element "Match String" expects one or more matching number string to route to one element or to a second if the number string does not match. "Yes" for matching and "No" if the input does not match. Minimum one input string is required to route to the next element. A string is a multiple digit input from the caller`s device.
- To add a string click the gear-icon to open the settings dialog
- Enter a timeout and select an announcement that will be played when the caller reaches this element,
- Enter a string at the bottom of the window and optional add a comment
- Click the "Add"-button to add the string-match
- Click "OK" to close the window
Now the element shows one or more strings, depending on the number which has been added and two blue points, one for matching "Yes" and one if the input does not match "No", which now can be connected and routed to new elements.
Destination
The element "Destination" route the call to a defined destination and ends the IVR.
System Record
The element "System Record" lets the caller record a message and ends the IVR.
The element "Email" sends a template e-mail and optional routes the call to another element.
5.2 Ring Group
The Ring Group feature allows to create a virtual extension that will in parallel forward the call to all available extensions and phone numbers within the ring group. As soon as the call is answered by one of those extensions, the call legs to all other extensions will be dropped. A listed panel and a vertical configuration panel are shown.
| Listed panel | |
|---|---|
| New | Add new ring groups to the list |
| Edit | Edit ring group from the list |
| Duplicate | Duplicate from existing groups for a new entry |
| Delete (Bucket) | Delete the ring group from the list |
| Configuration panel | |
|---|---|
| Configure Ring Group | The configuration panel |
| Name | A suitable name for the ring group |
| Extension | The ring group number |
| CID Prefix | The Caller ID from the ring group |
| Header 1 | A SIP text header to display the caller |
| Header 2 | A SIP text header to display the caller |
| Announcement for Caller | Enable an announcement for the caller for ex. A welcome announcement |
| Announcement for Target | The ting group member gets first an announcement before |
| Record this Ring Group | Enables that calls will be recorded. |
| Add DID | Assign the DiD number for the ring group for external calls |
| Assign extensions | Add internal extension number from the selectable list to the ring group. If follow me is assigned from an internal extension to an external number, the call will be forwarded. |
| Ring Group destination | Select the time -out destination. |
| Destination | The destination where the call will be forwarded after the time-out of the ring group has been reached. On no selection the call is rejected with busy tome. |
| Time-out second(s) | The ring time duration of the ring group in seconds until the time-out. |
5.3 Queue
Call queueing is a call flow to distribute incoming calls within a group of call agents. The queue feature allows the creation of ringing queues. The Ayrix distinct between static and dynamic agents:
Static agents
Static agents are assigned via web access to the related queue. The agent state of a static agents is that they are immediately logged in to the queue. Agents can be logged on and off with a feature code.
Dynamic agents
Dynamic agents are not assigned to a queue, but they can dynamically login to a queue with feature code “Register Call agent in Queue”, default (see also feature codes). Any user can be in the role of a dynamic agent by dialing the “Register Call agent in Queue” +queue number.
Queued calls can be routed to a next destination or gets busy tone. The Queue panel consists the following tabs.
- Basic Settings
- Agents
- Announcements
- Advanced Settings
The queue page is a listed panel. On the Tabs “Add”, “Edit” “Duplicate”, you can add, - edit a Queue group. By pressing “Duplicate” you simply copy an existing group for further configuration.
5.3.1 Queue Polling strategy
You can choose out of five queue polling strategies for call routing,
| Ring all | An incoming call will ring on all extensions simultaneously - multiple ring group. |
| Random | Incoming calls will be distributed randomly in the agent group. |
| Fewest calls | Incoming call will be distributed to the agent with the least call answers, e.g. on the last agent login. |
| Round Robin | Calls are distributed starting from the 1st available agent in the list. |
| Round Robin Memory | Calls are distributed from the last agent position of the previous call. |
5.3.2 Basic settings
The tab basic settings allow you to configure queue basics.
Field description
| Basic settings | |
|---|---|
| Name | Give your queue a suitable name |
| Extension | A group extension number to access the call queue |
| Queue outbound cid | The queue CLI, being displayed to external phone agents to indicate an inbound call is the queue. (default = empty) |
| CID Prefix | A CID prefix for name dialing, displayed to the caller, for example “HELP 0800xxxx” |
| Polling strategy | See the Queue polling strategy table* |
| Retry (seconds) | The no answer retry time in seconds, Time-out forwards to a next available agent if not answered, |
| Max callers | The queue length of maximum callers. |
| Sound while ringing | |
|---|---|
| Play ringtone | If the caller in the queue, play ring tone |
| Play Music on hold | If the caller in the queue play a Music on Hold, selectable radio, or a music file (see also Records - Announcements) |
| Add DiD | |
|---|---|
| Add DiD | Selects available DiDs from trunk line configuration being connected to the queue |
| Destination if no answer | |
|---|---|
| Destination | Call forwarding destination on no answer group time-out from the list after queuing time-out, |
| Time out in seconds | The call forwarding time-out in seconds on no answer of the queued call. The call will be forwarded to the selected destination. |
5.3.3 Agents
The tab Agents allow you to assign extensions who are answering the queued calls.
| Basic settings | |
|---|---|
| Name | Give your queue a suitable name |
| Extension | A group extension number to access the call queue |
| Queue outbound CID | The queue CLI, being displayed to external phone agents to indicate an inbound call is the queue. (default = empty) |
| CID Prefix | A CID prefix for name dialing, displayed to the caller, for example “HELP 0800xxxx” |
| Polling strategy | See the Queue polling strategy table* |
| Retry (seconds) | The no answer retry time in seconds, Time-out forwards to a next available agent if not answered, |
| Max callers | The queue length of maximum callers. |
| Sound while ringing | |
|---|---|
| Play ringtone | If the caller in the queue, play ring tone |
| Play Music on hold | If the caller in the queue play a Music on Hold, selectable radio, or a music file (see also Records - Announcements) |
| Add DiD | |
|---|---|
| Add DiD | Selects available DiDs from trunk line configuration being connected to the queue |
| Destination if no answer | |
|---|---|
| Destination | Call forwarding destination on no answer group time-out from the list after queuing time-out, |
| Time out in seconds | The call forwarding time-out in seconds on no answer of the queued call. The call will be forwarded to the selected destination. |
5.3.4 Announcements
The tab announcements allow you to configure an announcement for the caller and agent.
Field description
| Announcements for Agent | |
|---|---|
| Announcements | Select if a general announcement should be given to the agent |
| Announce the time the caller is waiting | Enable/disable if the agent should be informed about the waiting time of the caller before transfer. |
| Announcement for Caller | |
| Announcement | Select the announcement that should be played to the caller. (is not music on hold!) |
| Announce position in queue | Enable/disable if the queue position should be announced, “you are the 1st,2nd 3rd in the queue” |
| Announce waiting time | Selects if there is a waiting time before the announcement is played, or just should play once. |
| Play announcements above every second | Delay time in seconds between announcement repetition. |
5.3.5 Advanced settings
Advanced settings tab is to enable/disable queuing features, Recording- and timer settings for call queuing.
| If no agents in queue | Exception handling if no agents are logged on. |
| Caller can enter queue if no agents | The caller can still dial the queue, if no agents present, depending on Time-out the call is being forwarded to the destination. |
| Kick caller out of queue when last agent leaves | As the last agent logs off, calls in the queue and incoming calls are disconnected with busy tone. |
| Recording | |
| Record this queue | Enable/disable call recording for queued calls for quality audits. Recording is only active for calls answered by an Agent. forwarded calls are not recorded. |
| Agent timing | |
| Time-out for agent after successful call | Agent after call work time in seconds. The time switching the agent absent to complete work on a call. |
| Immediately pass call to next agent on busy/congested | Enables/disables if a call should go to the next available agent in case of busy or congested, otherwise the call remains in the queue, until the agent hung up. |
| Delay between answer and call connect to agent (seconds). | A delay time in seconds before the transfer of the caller to the agent is executed. |
5.4 Conference
The Callflow feature “Conference” creates audio conference rooms. You can create several Conference circuits for internal and external attendees. The maximum number of attendees is limited to maximum of the extensions and trunk lines that are available. When you dial in the pin number is requested.
By selecting a Conference room from the list, you can prepare and send E-mail invitations to attendees. Prepared invitation templates for conferencing are available under: “System”–> “Email Templates”.
The conference window shows you a list panel of the conference rooms. The conference window contains four (“4”) tabs to Add, Edit, Duplicate rooms and Sent invitation mail.
With the search bar you can enter a phrase of an Extension or name to search the correct room. The search entry needs an exact match. It distinct between upper- and lower-case characters.
Pressing tab “add”, a new conference window opens. That window contains further tabs to create a new Conference room. To configure the conference room following tabs are present.
- Basic Settings
- Conference Room Settings
- Recording
- Advanced Settings
5.4.1 Basic Settings
Field description
| Basic Settings | |
|---|---|
| Name | Name of audio Conference Room |
| Extension | Extension number of Conference Room |
| Pin admin | Pin (password) for the conference leader to access, should be different to PIN Participant |
| Pin Participant | Pin (password) for the attendees to access the conf. room |
| Maximum Members | Select the maximum number of member Size incl. |
| language | Select the voice announcement language |
| Add DiD | Add available DiD number for external inbound calls to the conference. |
5.4.1.1 Terminal conference control menu
Conference room settings are set on the tab Conference.
Field description
| Announcements | |
|---|---|
| Announcement played to the participant | Select an announcement from Records |
| Prompt participation for name and play into conference | When dial in to the conference, the IVR request your name: Your name is announced to the attendees when transferred into the Conference. |
| Let the participant review their name | When prompted for a name a confirmation of the participants name is requested. |
| Announce number of participants to joining participant | An announcement is played of a dialing attendee about the number of participants |
| Announce number of participants to all the participants | An announcement to the attendees in the conference room is played. |
| Announce empty conference room | Announce when only one, or the first person dials in to an empty Conference Room |
| Music on Hold | |
| Play music on hold when only participant in room | To avoid silence, when a single participant has entered in the conference room MoH is played until bridged depending on further settings by the conference leader or other participants. |
| User Management | |
| All participants start muted | Access to the conference room before the conference leader has dialed in. To avoid talk and noise and the participants start muted and music is played. |
| Make participants wait until join admin | Access to the conference room can only started when the conference leader has dialed in. |
| Kick participants when admin leave | Disconnect all attendees immediately when the conference leader hangs up. |
| Kick participants out of conference after (seconds) | Leave the attendees in the conference for a bit time (in seconds) after the conference leader hung up. For example: a discussion round afterwards. Or to remain the conference room open in case of a leader interruption. The time-out disconnects all attendees. |
5.4.2 Advanced settings
Field description
| Pass DTMF to conference | Enables/ suppress DTMF tones to the conference |
|---|---|
| Milliseconds of detected silence to trigger silence detection | Default 2500. (2.5 sec) silence suppression detection drops noise. It starts dropping silent IP packets. Made, to indicate the caller that the conference is not a deaf ear, this delay time takes care before the silence suppression starts. |
| Drop silence from audio sent to bridge | Silence packets are dropped before it is sent to the conference bridge. |
| Apply denoise filter to audio before mixing | An additional denoising filter is added to the conference bridge, for noise reduction. |
| Jitter buffer before audio stream mixing | Enables/disables an extra jitter buffer to the conference audio, to reduce signal disruptions. |
5.4.3 Send Invitation mail
To invite your conference attendees, you can prepare an e-mail to send out. Pressing tab “Send invitation mail opens a window with the prepared template. The selected email is based on your Language selection in the conference Room configuration.

In “System” menu-> “Email” - > tab” E-mail templates” prepared email templates are available. You can add your own email template as well.
xxxxxxxxxxGet-ExecutionPolicy -ListOutput: LocalMachine Unrestricted -> ansonsten umstellen
Set-ExecutionPolicy Unrestricted
5.5 Time Condition
The Time condition menu enables you to prepare calendar-based time conditions, in the call flow for incoming trunk calls.
The Ayrix validates if the time condition is “true” or “false” and executes the action. This time condition is set for inbound calls.
For example: to inform callers with an announcement, for shop opening times, or to forward callers outside opening hours to a security service. Or a meeting event.
The Time Condition validation is a 2^(nd) priority forwarding type, after day/night switch, before 3^(th) individual forwarding for the assigned trunk lines.
| Configure Time Condition | |
|---|---|
| Name | Give your time condition a suitable name: for example: meeting, opening times |
| If time doesn't match | |
| Destination | Select from the list the destination in case of a false condition. |
| Add DID | Add the inbound trunk lines to the Time Condition. |
| If time matches | Here you create your calendar-based events. |
| Add Events | A pop-up window to enter your event See event windows |
5.6 Intercom
The intercom menu is to provide intercom calls, to announce a voice message to a single or multiple phone user simultaneously in a single direction. Intercom is an auto answer and loud speaking function at the receiving extension. To get the Intercom working the telephones must support the intercom feature.
A typical application of the intercom is a chief-secretary or a doctor-nurse setup. The chief/ doctor has a Push2Talk or Intercom button on his Telephone. The secretaries/nurse telephone has the Intercom enabled to answer automatically via the loudspeaker. the chief announces: “next guest/patient please…”. The intercom windows consist of a list panel and a configuration panel.
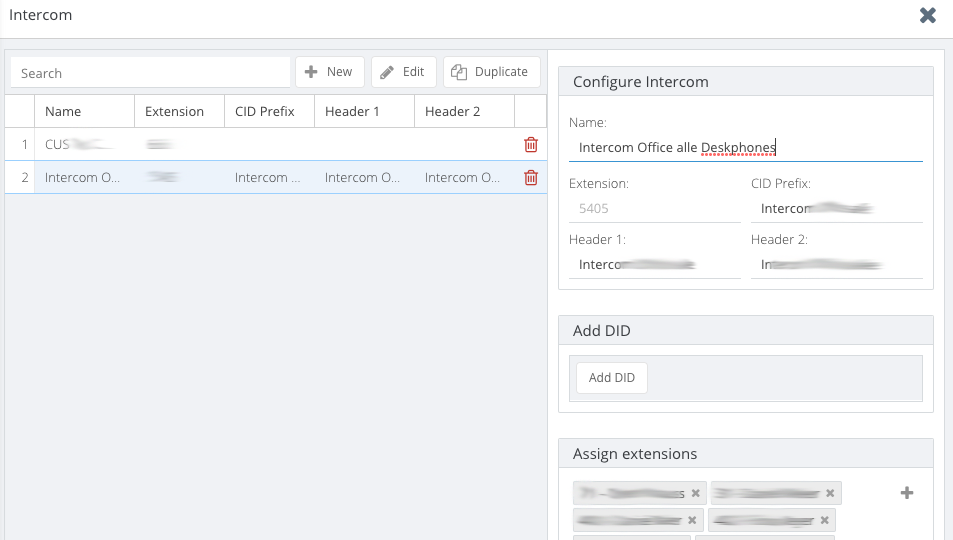
| Configure Intercom | |
|---|---|
| Name: | Give your intercom a suitable name |
| Extension: | The extension number that you dial to setup an intercom call. |
| CID Prefix | The number or name display that is sent to the caller |
| Header 1 | Send a 1st text header due intercom call setup |
| Header 2 | Send a 2nd text header due intercom call |
| Add DID | Select from an available DID line to start an intercom call from external |
| Assign extensions | Select the participants from the list |
5.6.1 Intercom button assignment
Intercom must be enabled. The telephones must support the intercom feature.
Check your feature list of your telephones. (SIP terminal features 3.4)
Example intercom receiving. SNOM 785advanced configuration settings for intercom receiving.
Example: line key settings for intercom sending. Intercom: setup or disconnect an intercom connection. Push2Talk: Establish the connection as long the Push2Talk key is pressed.


Important Notice: The following HW types are currently supported:
- Snom, Yealink, Mitel and Polycom
5.7 Hold
Hold is a centralized park function to park calls in the Ayrix. Call parking is a feature that allows a participant in a call to put the other participants on hold while they themselves hang up, and (for example) on another place retrieve the parked call by dialing the park number.
| Configure Hold | |
|---|---|
| Masterpark | The master number for general park. parked calls will be retrieved in FIFO order |
| Position from / Position to | Predefined parking spaces for individual parking calls. |
| Maximum Parking Time in seconds | The maximum waiting time for callers in the parking queue. On time-out the called party is informed by a call waiting tone in case he is busy, or ring back when free. |
5.7.1 Pool and Park+Orbit
The telephone extension must support the park feature. Here an example for the line key settings. An example of the line key.

6 Day / Night
The Day / Night feature allows to redirect a set of DID numbers to the same specific destination. When a Day /Night template is enabled, in the list the lamp indicator on the web page as well when programmed on the terminal is switched on green.
The Day /Night module has the highest forwarding priority, above individual and group time conditions as well other forwarding’s.
Notice: In case multiple Day /Night templates are enabled, the first active template in the list ranking will be selected.
Switching from day to night status is set manually by enabling the template in the list or set on a telephone with a Busy Lamp Field (BLF) function key button. A listed panel of Day / Night templates and a vertical configuration panel are shown.
Field description
| Day / Night | |
|---|---|
| Enable Day / Night | Enables the template for Day / Night activation. |
| Day /Night name | A suitable name for the template. for example. Weekdays, weekends, holidays. |
| Redirect all DIDs | Select whenever particular DiD numbers or all numbers are being forwarded due night status. |
| Destination | Selects one destination from the list where incoming calls are being forwarded to due night status. |
Day/Night BLF button assignment
Depending on the telephone features a Busy Lamp Field (BLF) can be assigned.
A named extension is added due assignment, for example. “dnLamp_1”. That name is the reference at name@IP_address_or_FQDN on BLF button assignment.
De-/activating with the button also switches the Day / Night lamp status at the webpage.
Example:
Day/ Night assignment on the 2^(nd). (BLF) button on a SNOM715 Telephone set. See also section: “SIP terminal Features”.

7 Routing
7.1 Trunk
To be able to make phone calls a SIP trunk should be registered on Ayrix.
Additionally, DID numbers have to be defined in order to receive incoming calls.
7.1.1 Adding a new SIP Trunk
To add a new SIP Trunk, click on "Add SIP Trunk" to open the Country/VoIP Provider window.
- Select the country where the VoIP provider operates
- Select the VoIP provider where the SIP Trunk that needs to be registered
- Click the "Add"-button
Now the "Basic Settings" window opens with the new created SIP Trunk.
7.1.2 Configuring the SIP Trunk
In the "Basic Settings" tab some values of the VoIP provider are already set. To complete and save the SIP Trunk data you must add some additional information. A window with Configuration settings panel and Codecs settings panel opens.
- Fill in a Default Caller ID.
- Enter SIP User-ID and the password, according to the providers Information.
- Click "Save"-button
The “Default Caller ID” may look like an inbound number, but in fact it is a recognition number (name it office number) to identify your Trunk by your provider. In the tab DiDs inbound numbers are configured.
The next tabs are shown:
- Basic Settings
- DiDs
- SIP Options
- Inbound headers
- Outbound headers
Basic Settings
This configuration windows contains settings to create and connect a SIP trunk.
| Configure SIP Trunk | |
|---|---|
| Name | Give your trunk a recognizable name. for ex. “Trunk-to-Provider” |
| Registrar / Server | The registrar server of the chosen VoIP provider. |
| Outbound proxy | A proxy that receives requests from a client, even though it may not be the server resolved by the Request-URI. |
| Port | The port which the SIP signaling communication uses. |
| Default Caller ID | Default number displayed at an outbound call destination |
| Max simultaneous calls | Limit the maximum of simultaneous incoming and outgoing calls. |
| Authentication | Authentication settings for your trunk |
| SIP User-ID | User-ID needed for authentication at the VoIP Provider |
| Password | Password needed for authentication at the VoIP Provider. |
| Format caller-called ID | |
| Caller ID Regex, Called-ID Regex | Regex rule formatting for caller or called ID to display the called party in an outbound call a correct number to call back. |
Codecs
The right panel shows the Codecs window. The codecs you want to apply for the SIP Trunk has to be selected from the tab "Available Codecs". Various codecs can be selected from the list and moved in the selected Codec list.
The used codec is a grade of the speech quality. The use of a particular codec is negotiated by the SIP protocol due call setup. The first codec that matches on both sides is chosen. In the Selected Codecs you can rank the codecs. Selecting trunk codecs, enables also default codecs for extensions.
| Codecs | |
|---|---|
| Selected Codecs | List of the selected Codecs, that will be negotiated with the opposite party |
| Available Codecs | List of available Codecs in the Ayrix |
Codec list A Codec is the digital translation of the voice to transmit a media RTP or SRTP stream, A description of the available codec usage.
| Codec | Description |
|---|---|
| G711-law. | 64Kbit/s pcm coding, with a fixed 8Kbit sample rate narrowband audio codec standard, except USA and Japan. |
| G711-ulaw | 64Kbit/s pcm coding with 8Kbit sample rate narrowband audio codec American and Japan |
| G722 | G.722, 7 kHz wideband audio sampled in ADPCM 58K, 56K und 64Kbit/s format streaming |
| G726 | G726 is an ADPCM speech codec with 2vairabele sample rate and multiple transfer rates of 16,24, and 40Kbit/sec |
| G729 | G729 narrow-band vocoder-based audio data compression algorithm, with Coding of speech at 8 kbit/s |
| GSM | Global System for Mobile Communications (GSM) is a codec in cellular networks |
| LBC | (Internet) Low Bitrate Codec (iLBC) is a narrowband speech audio coding format with different data frame formats. |
| Siren7 | Siren 7 (or Siren) provides 7 kHz audio, bit transfer rates 16, 24, 32 kbit/s with an audio sampling frequency 16 kHz. |
| Siren14 | Siren 14 (or Siren14) provides 14 kHz audio, bit rates 24, 32, 48 kbit/s for mono, 48, 64, 96 kbit/s for stereo transfer rate with an audio sampling frequency 32 kHz. |
| Speex | Speex is an audio compression codec tuned for the reproduction of human speech. Speex is targeted at voice over IP (VoIP) |
| Speex16 | Speex16 is an audio compressed codec using a fixed 16kbit audio sampling rate. |
Direct inbound dialing (DiDs).
To connect with the outside parties, Direct inbound dialing (DID) numbers have to be added to the Trunk. These DiDs are the numbers you can dial in to address the destination. Go to the "DIDs" tab. A window with a listed panel and a configuration panel opens.
Press “+New”.
Select in the configuration panel your single number or a number block where the callers can dial in. You can add a single Number or a Number block.
Press “save”.
Your new number block is now listed and available for assignment.
SIP options
In this window can be set the sip options for the Trunk.
Field description
| SIP options | |
|---|---|
| SRTP | Enables signaling and media encryption on the trunk line (TLS & SRTP). |
| Language | Set Language to select country specific media, for ex. ringtones |
| Re-Register Timeout | Trunk guarding, Re-Register time-out in minutes. |
Inbound headers
Due to the different RFC specifications, many signaling options for incoming SIP trunk lines remain. These SIP elements are inbound headers. Headers, or SIP elements that differs from the standard are known by your provider. For each SIP Message element, you can adapt several other SIP identification elements. On the webpage several inbound elements are listed.
We strongly advice to leave the values to default unless a specialist from your provider advice different.
| Call source identification | |
|---|---|
| “CallerNum” caller’ number (default: From > user): | [A]default: From > user: |
| “OutboundLineId” Outbound Line caller ID taken from Outbound caller ID setting in managed console. | [A]Leave default value |
| *OutboundCallerid” Outbound caller ID taken from Extension setting in management console | [A]Leave default value |
| “CallerDispName” Display name of a caller as it is From Header – Provided by phone settings | [A]Leave default value |
| “CalledName” that has been dialed (Default To>display name) | [A]Default To>display name |
| “CalledNum” number that has been dialed (Default To>User) | [A]Default To>User |
| “CallerName” caller’s name (default from>display name) | [A]default from>display name |
| OriginatorCallerID Original Caller number will be sent | [A]Leave default value |
| “DevHostPort” source address/port of message | [A]Leave default value |
| ContactUrl usually content of the contact field | [A]Leave default value |
| Selectable inbound elements |
|---|
| Contact: User Part |
| From: Display Name |
| From User Part |
| P-asserted Identity: Display Name |
| P-asserted Identity: User Part |
| P-Called Identity: Display Name |
| P-Called Identity: User Part |
| P-preferred Identity: Display Name |
| P-preferred Identity: User Part |
| Remote Party ID - called Party: Display Name |
| Remote Party ID - called Party: User Part |
| Remote Party ID - calling Party: Display Name |
| Remote Party ID - calling Party: User Party |
| Request Line URI: User Part |
| To: Display Name |
| To: User Part |
Outbound headers
A variety of outgoing SIP trunk signaling options following different RFCs remains possible. These call source elements depend on specific country and/or provider settings. For each SIP Message element, you can adapt several SIP identification elements. On the webpage several outbound elements are listed that can be changed.
We strongly advice to leave the values to default unless a specialist from your provider advice different. Depending on the type of SIP element there are 2 selectable lists [B&C]
| Outbound headers | |
|---|---|
| Contact User Part | [B] Leave default value |
| Contact Host Part | [C] Leave default value |
| Remote Party ID -Called Party Display | [B] Leave default value |
| Remote Party ID- Called User Part | [B] Leave default value |
| Remote Party ID - Called Party Host Part | [C] Leave default value |
| Remote Party ID - Calling party Display Name | [B] Leave default value |
| Remote Party ID - Calling Party User Part | [B]Leave default value |
| Remote Party ID - Calling Party Host Part | [C]Leave default value |
| P-Asserted identity Display Part | [B]Leave default value |
| P-Asserted identity User Part | [B]Leave default value |
| P-Asserted identity Host Part | [B]Leave default value |
| P-Preferred-Party-ID User Part | [B]Leave default value |
| P-Preferred-Party-ID Host Part | [C]Leave default value |
| P-Called-Party-ID Display Name | [B]Leave default value |
| P-Called-Party-ID User Part | [B]Leave default value |
| P-Called-Party-ID Host Part | [C]Leave default value |
Selectable parameters
| [B] Selectable outbound elements (self-explaining) |
|---|
| CallerNum number that has been dialed (default: To > User) |
| CallerDispName Display name of a caller as it is in From Header |
| CallerNum caller`s number (default From->user) |
| LineID internal number of lines |
| LineNumber external number of lines |
| OriginatorCallerID original caller number will be sent |
| OutboundCallerID outbound caller Id taken from Extension settings in management console |
| OutboundLineID outbound Line caller ID taken from outbound caller ID setting in management console |
| Leave default value |
| [C] Selectable outbound elements (self-explaining) |
|---|
| ContactUri usually content of Contact field |
| DevHostPort, source address/port of message |
| GWHostPort, gateway/provider host/port |
| OutHostPort: outbound proxy host/port |
| Leave default value |
7.1.3 Trunk Status
The Trunk list panel, the STATUS field shows you the actual trunk status of the configured trunk(s).
Field description
| Trunk Status | |
|---|---|
| Connection established (OK) | REGISTERED_[DAY*] |
| Incorrect password | Authentication |
| Incorrect URL Registrar | Request sent |
| Incorrect port | Request sent |
| Not active or no establishment (other failures) | Unknown |
*Day of the week, MON, TUE, WED, THU, FRI, SAT, SUN
Registration of a trunk may take up a few minutes. Be patient, if the lamp does not immediately switch from Registering into Registered_[DAY] Refresh your website!
7.2 Inbound
Inbound rules route inbound calls to specified destination, for Example Queues, Ring groups, extensions and other endpoints. Inbound rules can be created based on DID numbers.
Adding new Inbound rule
To add a new inbound rule, click on "New" to display the form.
- Enter a name for the Inbound rule
- Choose one or more DID by clicking on "+". If any DID numbers are not available, read the SIP Trunk setup guide
- Optional: Enter one or two SIP Headers
- Optional: Enter a CID Prefix
- Optional: Enter a CID restriction
- Choose one or more destinations by clicking on "+". If no destinations are available, go to the Extensions setup guide
- Click the "Save"-button
Field description
| Header 1, Header 2 | It is possible to add 2 SIP Headers to the Inbound rule. |
|---|---|
| CID Prefix | The CID prefix will be added to the calling number for name dialing. for example, you can add "ADM>" to show that the caller dialed the Number for the Administration. |
| Destination | If a CID is entered, every call to the DID above will be forwarded to the destination below. Regardless of any other Inbound rules. |
| Use for Fax | If checked this Inbound rule will be forwarded to a fax-extension or a fax-server. |
7.3 Outbound
To define how the Ayrix routes outgoing calls, outbounds must be set up. Calls can be routed over different SIP Trunks, based on the dialed number or the length of the number. At least one outbound rule is necessary to make outbound calls on the Ayrix!
7.3.1 Adding a new Outbound rule
To add a new Outbound rule, click the "New"-button to display the form.
- Enter a name and choose one available Trunk sequence
- Optional: Add a Pinset
- Optional: Create a new Trunk sequence
- Click the "Save"-button
Trunk sequences can be created and edited after clicking or either "Create new Trunk sequence" or "Choose existing Trunk sequence".
To move Outbound rules and change their order click on the "Move up/down" Buttons. Outbound rules on the top will be executed before Outbound rules on the bottom.
7.3.2 Defining Sub-rules for an Outbound rule
To define specific rule, click on the tab "Rules" to display the form.
- Click on "Add CalledID rule"
- It is possible to add various sub-rules to the Outbound rules:
- Pattern: Enter a specific Pattern to trigger this Outbound rule, for example - "9*" - all numbers starting with 9 would use this SIP Trunk
- Prefix: Enter a digit which will be added in front of the number before calling out, for Example - "3" - when the caller dials "123456", "3123456" will be called instead
- Strip: Enter a digit for how many numbers should be stripped from the number dialed starting from the left side, for example - "1" - when the caller dials "123456", "23456" will be called instead
Once a "CalledID check" has been added, a "CallerID rule" can be added. Click on the "+" inside the "CalledID check".
- Here a Caller ID can be added
- Choose a Trunk sequence or an outbound rule to which this Caller ID should be routed
All the rules can be moved via "Drag & Drop" to change their order. Rules on the top will be executed before rules on the bottom.
| Function | |
|---|---|
| Pinset | The Pinset, is a Pin code which must be entered via device before the Outbound rule can be triggered. |
| Trunk Sequence | The Trunk sequence defines the order in which the Trunks in the sequence will be used if one fails or is not reachable. |
7.4 Emergency Numbers
Emergency Numbers are country specific short dial numbers. Depending on the country selection in Trunk registration, the Ayrix creates a list of the local emergency numbers. These emergency numbers cannot be used for any other functions. You cannot edit or delete the default Emergency Numbers, however adding additional service numbers is possible. Some service numbers are using an unknown numbering plan. They can only be dialed within the country. For example, in Switzerland: the talking watch (161), or REGA -rescue services (1414).
Emergency numbers can you dial directly. These Emergency Numbers overrule all outbound trunk restrictions and chooses the first available free trunk. The format for custom Emergency Numbers is sent with a E164 Unknown” numbering plan.
The windows contain a search list panel and a configuration panel.
| Configure Emergency Number | |
|---|---|
| Name | A suitable name: for ex. “Ambulance” |
| Number | Emergency number 911, 110,112,144, etc. |
8 Records
The Records window offers you to prepare general announcements, as Voicemail Greetings or System recordings.
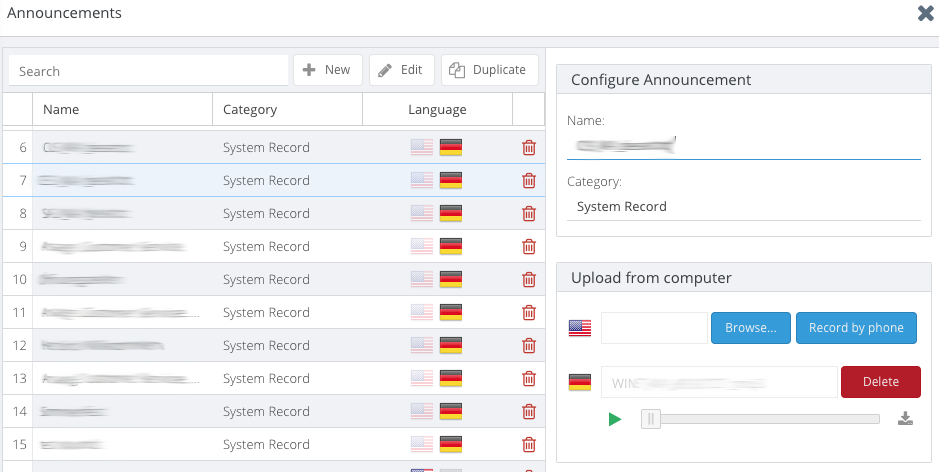
8.1 Announcements
The Records window offers you to create general announcements for the system and users. Records can be Voicemail Greetings and system records.
The announcement window shows a listed panel of all announcements and a configuration panel. The tabs add, edit, and Duplicate and a search bar, to search a phrase in the Name field, upper/lowercase allowed.
Voicemail Greetings is just a single record.
On “System Record” is a data-record to save announcements for multiple languages. First you create the data-record, then select the source file upload by browsing your local system or Record by Phone, you continue with upload by file or record selecting the extension.

By pressing *Record by phone” a pop-up window appears to select the extension for recording. A guidance leads you through the options.
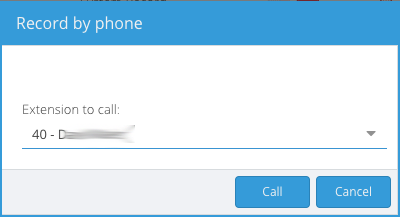
These announcements can be used for various features.
| Configure Announcement | |
|---|---|
| Name | Give your record a suitable name |
| Category | Select between a System Record or a Voicemail Greeting |
| Browse | Browses the local computer for any sound files |
| Record by Phone | Enables audio recording with a phone extension. |
9 PBX
9.1 Feature Code
The Feature Code list contains codes to enable and disable telephony features.
You can change these codes to a preferable code.
Depending on the function a feature code may contain a start “*” as suffix, meaning that this feature is updated. For example: *56*201
If a feature code function is initialized, then the feature code has only a star as prefix. *21567
| Configure Feature Codes | |
|---|---|
| Set maximum incoming lines | Default “13” limit /enhance the number of incoming lines by dialing. Until the max. lines set in the Extensions advanced options has been reached. |
| Enable/Disable Redirects | Default “*25” to enable/disable the follow- me list |
| Voice Recording | Default “45” When voice recording is set, Enable/disable voice recording for agents in a queue. |
| System Recording | Default “46” |
| Voicemail Recording | Default “47” Enable/disable voice recording per extension |
| Global Voicemail Recording | Default “48” Enable disable for all voicemail Voice recording. |
| Register / Unregister Callagent in Queue | Default “*55” Agent absent /present status in the queue |
| Restart phone | Default “*69” A dialed code to reboot the Extension immediately |
| Make anonymous calls | Default “*99” Dial in front of your dialed number to setup an anonymous call |
There are also read only feature codes, these fixed codes are not listed in the feature code list. See Feature Code for a full overview of read only feature codes in the appendix.
9.2 Transfer Call back
The timeout value in seconds to return the caller to its originator in case of an unsuccessful blind transfer.
| Transfer Callback | |
|---|---|
| Enable Transfer Callback | Check if the transfer fails on no answer time-out. The call is returned to the transferrer |
| Configure Transfer Callback | |
| Waiting time until transfer callback (seconds) | The waiting time the caller waits before he returns to the transferrer |
| Prefix | Send the caller a CID prefix due the Transfer Callback condition. |
9.3 Speed Dialing
Speed Dialing enables you to create a general list of short dialing numbers to dial out extended numbers. This Speed Dialing list is valid for all users. Speed dialing with predefined numbers you can overrule outbound restrictions. For example: you want to call customers in foreign countries, while a general Geo CID restriction is set. Speed dial codes cannot overlap other dialing and outbound destinations.
With Tab
- import CSV, you can upload a list of Speed Dialing codes to the Ayrix
- CSV template, you can download the template list from the Ayrix to your local system
9.4 Music on hold
This MoH feature is to configure all music on hold sound files and radio streams. The window contains 3 tabs: MoH Groups, Sound files and Radio Streams.
9.4.1 MoH Groups
The window displays a list panel and a configuration panel.
In the configuration panel you can add a Sound File or a Radio stream. The files can be uploaded in tab Sound Files. Radio Streams can be added in the tab Radio Streams by adding a file or a stream - a pop-up window of the next tabs opens.
| Configure MoH Group | |
|---|---|
| Name | Give it a suitable name |
| Type | Select Sound file, to add a sound file, in *.wav or MP3 format Select: Radio Streams, to add an URL of a live, web radio stream. |
| Add Sound Files | See Sound Files |
| Random | Enable / Disable if the sound files should be played randomly or following the list. |
| Add Radio Stream | See Radiostreams |
9.4.2 Sound files
Sound files is an upload window to upload file in. *.WAV or *.MP3. format.
| Upload Sound File | Select from your local disk a sound file in a WAV or MP3 format. |
|---|
9.4.3 Radiostreams
This entry configures live streams, or a radio streams to callers when in Music on Hold (MoH) state.
- Only HTTP-Radiostreams are supported without SSL-Encryption.
- Only MP3-Streams are supported (MPEG-1 / MPEG-2)
- Playlists are not support (M3U / PLS)
| Stream IP / URL | Enter the IP address and port number or an URL for a radio live stream. See also the port list (appendix) |
|---|---|
9.5 Global VoiceBox
The Global VoiceBox is to assign and manage general voice box recordings that are not assigned to a particular user. The global Voice box is intent for example disconnect states. For example, in a calendar state of an Extension. The Global VoiceBox is a general box. You can assign just one announcement and a voicemailbox.
The Global VoiceBox is a virtual extension. As there is no extension number specified, you can assign a DiD number to dial-in, so you are able listen to the recorded voicemails. If the Global VoiceBox is selected in a Callflow or used as Extension feature, a caller can leave a voicemail message.
In the window panel you can manage the voicemails in a same way as Extension voicemails.
The Global Voice Box window contain in the left panel the configuration settings, at the right panel the global overview of actual and archived voice mails.
| Global VoiceBox | |
|---|---|
| Basic Settings | Create an announcement for disconnect state. |
| Enter the E-mail address whom it concerns, the general E-mail box. | |
| Timeout | The timeout in seconds before the incoming call is forwarded to voicemail. |
| PIN | The PIN code number used to listen to the voicemails received. |
| Manage Greetings | Remark: To activate a next greeting message, delete the first message, then select the new message and press save to activate. |
| Announcement | Select from the announcement list a general announcement |
| Advanced Settings | |
| Number of messages | The max. number of new voice mails that are stored in the list of new voicemails |
| Delete after send: | Select whenever messages recordings should be deleted immediately after they are sent or downloaded. |
| Delete oldest messages | Erase the last message from the new voicemail list. |
| Send attachment | Sent voicemail massages as email attachment |
| Play messages | Enable to play messages of the new and old voicemail list |
| Read out number | The pronounce the message number |
| Announce date and time: | Pronounce date and time in the beginning of the voicemail. |
| Options for caller | Whenever the caller can re-record his voicemail message. |
| Confirm voicemail | The caller can confirm if his recording is correct or wants to be re-recorded. |
9.6 Geo CID
Geo CID is a feature to create a rule for an Extension to send an individual caller ID (CID) based on E164 country and Region codes. See also Extensions menu - >Geo CID.
In the configuration panel, first the country must be added to the list. After country assignment the Region of that country can be assigned. The region is checked by the incoming digits after the country code and not only limited to area codes.
The window contains a listed panel and a configuration panel. The list panel contains three (“3”) tabs:
- New Region
- Edit
- New Country
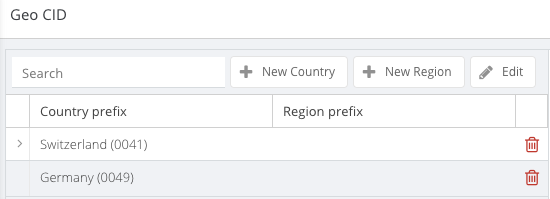
Important notice:
In the list panel shows the assigned countries. Only the Country AND Region CIDs are shown in the Extensions menu when the extension has Geo_CID enabled. See Extensions, -> Geo CID, -> “Configure CIDs”
| GEO CID | |
|---|---|
| Configure Country | Add country to Geo CID allowance rules |
| Country prefix | Select the country from a list to allow receiving calls from there. |
| Region prefix | Allow specific regions from the selected country to dial in., by entering the incoming digits to be checked, or area code(s). |
9.7 CTI
CTI is a general term for Computer Telephony Interface. Microsoft developed and released in 1993 the “Telephony Application Programming Interface” (TAPI) to interconnect between PBX and PC. That TAPI protocol became a standard. Other standards for CTI interconnections are CAPI, TSAPI, JTAPI, CSTA, e-CSTA ua-CSTA. LRMS. etc.
9.7.1 TAPI
Telephony Application Programming Interface (TAPI) is a standard interface to connect telephony with a server. A (Windows) TAPI server is responsible to handle the call flows between PBX and client. Microsoft released multi versions. TAPI version 1.x, 2.x and 3.x. TAPI 2.1 and 3.1 are still used today.
There are two types of TAPI interfaces. The 1st party TAPI interface communicates directly with an extension (Single line configuration). The 3rd party TAPI interface handles the telephones via the PBX (multi line configuration).
With the number of options in the TAPI specification, not all features might have been implemented by the manufacturer.
To connect the Ayrix with an TAPI application a TAPI server is required. That server talks to a TAPI driver or TAPI connector.
That tape connector connects the Ayrix IP interface port (5038). See Figure principle TAPI
Ayrix offers to use different TAPI applications. Multiple connections from different IP addresses are possible.
For hosted connections between TAPI clients (s) and Ayrix, a security module restricts unauthorized access on the TAPI port.
Principal TAPi server
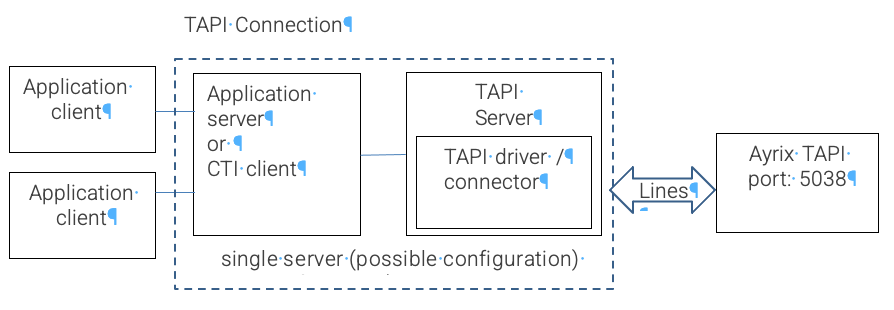 The TAPI menu has a listed panel on the left and a configuration panel on the right. The listed panel shows the TAPI server connections. In the configuration panel you can assign a TAPI connection.
| TAPI conf | |
|---|---|
| Authentication | |
| Username | Enter username given with the TAPI services |
| Password | Enter a password, 7 digits or longer containing at least one uppercase and one lowercase, one digit and a special character |
| Description | Description is an information field to enter your notices about your TAPI connection. This is a longer field. In the list panel press the “+” preceding the line to read your notice. |
| Deny | |
| IP address | Enter an IP address to block for TAPI and, |
| Netmask | enter a blocked IP range/subnet, press “+” and “save” |
| Permit | |
| Ip address | Enter an explicit IP address t for TAPI access and, |
| Netmask | enter an explicit IP subnet to whitelist for TAPI access. Press “+” and save |
TAPI connector or TAPI driver installation
To connect the Ayrix with an TAPI application, or CTI client a TAPI server is required. Since Microsoft Windows XP, every Windows pc can used as TAPI server. Anno 2020 the most TAPI Installer files integrates a complete installation of your TAPI suite, Driver/connector, TAPI server and application. These modules are connected due installation as shown in figure: principle TAPI. Follow the instructions of your TAPI application supplier.
If you want to correct your configuration here is a general! guideline to check/install your TAPI connector/driver on Windows manually.
In Windows, go to Settings –> Control panel à “Phone and Modem options” -> tab: Enhanced, see picture check if your driver is loaded, if not
- Press “Add” to add the TAPI driver, a 2^(nd) window opens. The installed TAPI driver should be visible, select and press “Add” again.
- Back in the Main window press “Configure”, to add/change the connection, lines and extensions.
- Enter the IP address and port number of the Ayrix.
- Add TAPI lines and extensions.
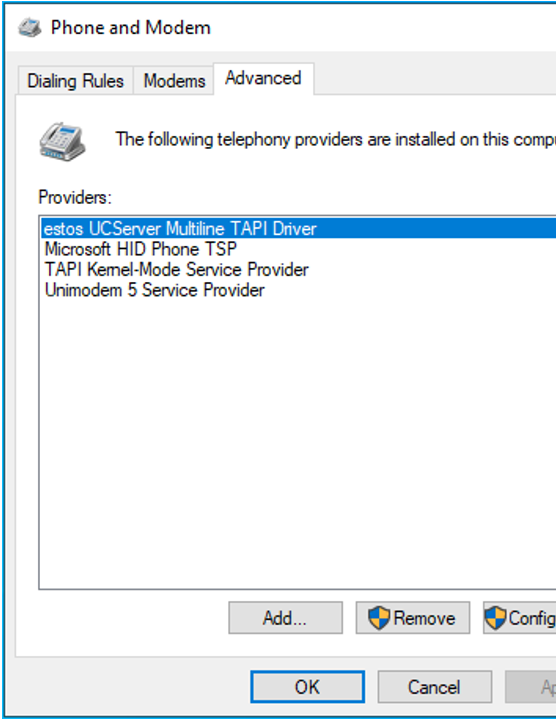
The TAPI installation a server configuration depends on the installation. Refer to your application supplier for a detailed installation description.
10 Fax
10.1 Fax Extensions
Fax Extensions are special extensions used for fax machines. SIP uses a T38 protocol to communicates between SIP fax machines. These extensions negotiate with the opposite party to apply that T38 protocol.
The window has a list panel and a configuration panel.
Field description
| Authentication | |
|---|---|
| Fax Extension | Extension number for fax machine |
| Fax authentication ID | Authentication ID for SIP registration |
| Password | Authentication password for SIP registration. |
| CID | |
| CID | CID number to display to the caller |
| Add DID | |
| Add DID | Select from DID list an available trunk line |
10.2 Fax Server
The Fax Server is a Fax-to PDF-converter and send the converted document to an e-mail address. Conversion from email to fax is not possible. The window has a list panel and a configuration panel.
Field description
| Authentication | |
|---|---|
| Fax Extension | The extension number to address the fax -to pdf converter |
| Add DID | Add an available DID trunk line to the extension. |
| PDF receiving mail | The destination e-mail address |
11 Phone book
The Phonebook is to create add, search, import CSV, telephone book entries. Phonebook entries can be selected between Business-, Mobile-, and Private numbers.
Import of a CSV File is possible. The import adds the CSV entries to the existing database. The 1^(st) line of the CSV is title line and is dropped due import.
To import new entries an empty CSV Template can be exported. See picture.
The window contains a listed panel and a configuration panel.
Listed panel: In the listed panel you can search add, edit, or duplicate. You can sort column contents in an ascending or descending order. and in the column the down selector button you can make columns visible/invisible.
Configuration panel
| Contact | |
|---|---|
| ID | Primary key of Phone book database entry |
| First name | First name (max 255 chars) |
| Last name | Last name (max 255 chars) |
| Company | Company name (max 255 chars) |
| Type | = “Phone book” |
| Number | Number and Alphabetic characters |
| Business - Mobile - Private | Select the type of number |
CSV Template export
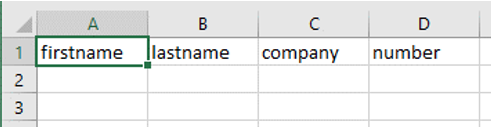
Remark:
The full list is imported. Remove the header before importing.
The default column Type is: Business.
12 Security
12.1 Brute Force Protection
One of the major security modules of the Ayrix is the Brute Force Protection module. That module combines an Intrusion detection and an Intrusion and prevention.
The Brute Force detection checks the amount of the failed login attempts and/or the number of telephone registration attempts within a specified time. If the Ayrix receives too many attempts, it will block these Ip addresses to prevent further (unauthorized) access. After the dismiss time it will release these IP addresses.
The Brute Force Protection dismiss IP the address that belongs to the installation host
The Brute Force Protection consist of two tabs Brute Force and IP Black/whitelist
12.1.1 BruteForce
The BruteForce Module checks on telephone registration attempts.as well web access attempts within an elapsed time. Hackers are
Field description
| Brute Force Protection | |
|---|---|
| Register Attempts | |
| Enable | Enable/disable the BruteForce detection the number on Register attempts |
| Register attempts | These are the number of registrations |
| Within (seconds) | The number of registrations attempts within the elapsed time in seconds. |
| Dismiss block after (seconds) | The time where the blocked Ip addresses should be released. |
| Weblogin attempts | |
| Enable | Enable/disable BruteForce detection on Web access login attempts. |
| Login attempts | Check the number of login attempts |
| Within (Seconds) | The Time elapsed in seconds due the number of login attempts. |
| Dismiss block after (seconds) | The Time when the blocked IP addresses should eb released |
12.1.2 IP Black/whitelist
The IP Black/whitelist is a security mechanism that blocks (blacklisted) traffic directly. The IP Whitelist allows explicit (whitelisted) traffic. The whitelist entries are not checked by the BruteForce mechanism. It can be selected between Web and/or Phone IP ports.
The IP address of the installation host is by default excluded from the blacklist. Text messaging might send via external servers
Field description
| Blacklist | |
|---|---|
| Add to blacklist | IP address to block access to the Ayrix. |
| Whitelist | |
| Add to whitelist | IP-address to allow access to the Ayrix |
| Service | Selector of traffic type, IP address of Phone, Web, or both |
12.2 Number Blacklist
The Number_Blacklist is a call flow based on blocking inbound calling, outbound dialing, or both way numbers or a number range. With number registration we can block calls or forward these calls to an alternative destination.
The window consists of a list panel and a configuration panel.
With “Add” you can assign a number.
Anonymous calls “*****” cannot be blacklisted.
| Number Blacklist | |
|---|---|
| name | Give your Number Blacklist entry a suitable name: |
| Country code | Add the country code. Number_Blacklist does not split between number in a National or International format. Both will be detected. For ex. 0041 79 xx as well 079 xx. |
| Number (without leading 0) | Enter the number or number range, for example 056123, meaning that the range of all numbers from 056 123 0000 to 9999 are blocked or forwarded. |
| Inbound Outbound Both | Select whenever the number on inbound, outbound or both way calling should be blocked. |
| Destination if blocked | Select from the list the alternative destination. |
12.2 Geo Restrictions
With Geo restrictions you can enable geographical Phone Registering, Webinterface and Country Codes dialing access. The window contains three (“3”) tabs.
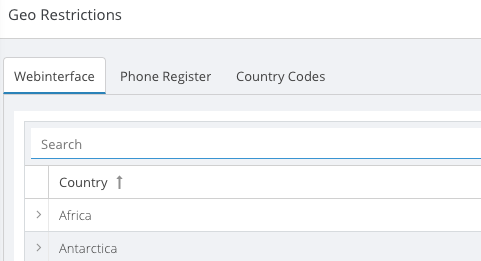
By default all regions are switched off (=restricted). This to avoid hacker attacks due Installation. Enable only country and regions where you are register phones, web access, or calling to.
| Geo Restrictions | |
|---|---|
| Webinterface | Web access allowance is enabled by selecting by countries IP address list verified in an IP location database. (Maxmind). |
| Phone Register | Phone registration access allowance is enabled by countries IP address list verified in an IP location database (Maxmind). |
| Country Codes | Inbound calling and/or outbound dialing allowance enabled for countries. |
12.3 SSL
Secure Sockets Layer (SSL) is a protocol for securing communication on the Internet. It provides a way to encrypt data before sending it to users. A public key exchange provides a way to send encrypted messages that are decrypted at the opposite site.
When SSL is enabled on a webpage, the URL will have an “https” prefix instead of an “http” prefix. Https uses a different port (see appendix).
SSL certificates are issued through Certificate Authorities (CAs), which are entities entrusted with selling and distributing SSL certificates. CA`s form the backbone of SSL, providing new certificates and verification of existing certificates. To make your web browser with Web encryption of the Ayrix publicly accessible to need to execute the following steps:
- The first step is to choose a Domain name at a domain registrar, and you choose a CA. Fees may apply for both.
- The next step is to generate in the tab “Request Certificate” a private key and the certificate signing request (CSR).
- The generated information needs be sent to the CA,
- CSRs contain information that will be used in the certificate such as the location of the organization, the domain name, and the email address of the administrator.
- When the CA verifies the CSR, they will send the certificate along with several additional certificates. These additional certificates are known as intermediate certificates.
- With the tab “Add Certificates” you install the private and private key, the SSL certificate as well the SSL Bundle
- Once these certificates are installed, the server is SSL-ready,
- Reload the webpage to access now the HTTPS://IP_addres_or_FQDN.
Request Certificate
That SSL service generates such a “self-signed” certificate Request (CSR).
The Administrator certificate signer is the 1est administrator registered in the User authorization.
| SSL entry | |
|---|---|
| Request Certificate | Create a self-signed certificate |
| Location | your companies location/address |
| State | Your state |
| Country | Your country |
| Organization | Your Organization name |
| Organization Unit | Your department |
| SSL Domain | Your (unique) Domain name |
Add Certificate
Most probably, your company have already valid certificates. by an earlier registration. In the Tab “Add Certificates” you can. This certificate data is downloaded to the operating system. Now the webserver has also access to that.
| Add Certificate | Paste a self-signed certificate or add a signed certificate from the certification authority. |
| Private Key | The private key. Copy & paste your private key in a complete file from: -----BEGIN PRIVATE KEY----- to ---END PRIVATE KEY----- |
| SSL Certificate | The certificate received from the CA |
| SSL Bundle | The bundle file of both, private and public certificate to verify the entries. |
In an upcoming release VoIP security this Certificate generation can be applied for VoIP encryption (see SRTP).
Important security notice: Private keys should not be accessible in normal operation, As the public and private key is displayed on the web page, we strongly advice to restrict the SSL page access only to the IT Administrator(s). That can be restricted in the User Authorization settings.
What is CA bundle? CA bundle is a file that contains root and intermediate certificates. The end-entity certificate along with a CA bundle constitutes the certificate chain
The chain is required to improve compatibility of the certificates with web browsers and other kind of clients so that browsers recognize your certificate, and no security warnings appear.
Comodo may send you a complete CA bundle in a zip file with a *.ca-bundle extension or root and intermediate certificates separately.
12.5 User Authorization
The User Authorization menu offers you to register administrators and users with their authorization for telephony and system usage. Their username must be unique.
Per default the first administrator, “Admin” is present. That Admin is created due the license generation. That Admin cannot be removed.
The user authorization menu forms a two-step configuration. The window “Web User / Group”. contains 2 tabs. “Group” and “User”. In the “Group” tab you create, edit, and delete groups. In the *User “, tab you create, edit and delete users and add/change them to a group.
12.5.1 Group
The Group list-up the group names. With the tabs “Add” and “Edit” you can add, edit, and delete group names. As well a search bar entering a phase of a name. to search. Creating different groups enables to set specific permissions, for administrator and user groups. For example: access permissions
Permission In this window you enable or disable the permission per group. An administrator can configure for each group the user permission of all configuration modules. that allows the administrator to limit the module selection in such a way that telephony users can configure the features by themselves.
The listed panel is categorized by a tree of the main menu items and sub-modules.
The permissions are split up in read, write, and delete options. For every Module you can set group permissions.
The Administrators group have all permissions by default.
We strongly advice to leave the category “Dashboard” available for all groups. Restricting Dashboard permissions results in an immediate error message on login.
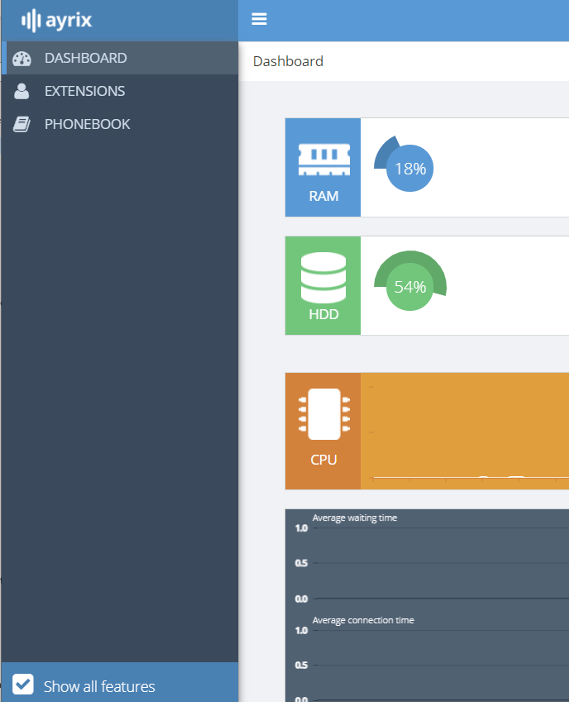
Users
The Users tab has two panels “Users in group” and “Available users”.
Here you can assign the users membership registration to a group. A user can have multiple memberships. That user has the sum of all Membership permissions.
Field description:
| Users in Group | Membership of group. |
|---|---|
| Available Users | The users you assigned. |
User
Here you can assign system “User” for system administration. The system administration and telephone user configuration are working independently,
The “User” window contains a listed panel and a configuration panel. The Web “User / Group” window contains list panel of the users and a configuration panel.
The listed pane contains three tabs: add edit duplicate, to add a user, to edit or duplicate user entries.
Be aware: in case of edit the user content. The configuration entry is Linked to the password entry. In case of a password change you can only delete and re-assign the user.
Field description
| User | |
|---|---|
| First name | First name of the user |
| Last name | Last name of the User |
| Username | Username for system access |
| Password | Password for system access |
| Assign the users e-mail address for Email notices | |
| Language | Select the preferred language for system administration |
| Group | |
| Group | Assign the group membership |
| Extension of this User | |
| Extension | Optional: add an extension number to that system user |
Pinset
With Pinset you can create default Pin-sets for Extension groups. The window shows a list panel and a configuration panel. The pin is used to listen to your recorded voicemails
The Pin for Conference Room access is set separately in the Conference Room configuration.
Configure Pinset Group
| Configure Pinset Group | PIN assignment for groups |
|---|---|
| Name | Give a suitable name: for ex. “Login Pin Authentication”, “All Subscribers,” “All Assistants” |
| PIN | The Pin Number |
| Assign Extensions | The extensions who should be included. |
Field description
| Pinset | The Pinset, is a Pin code which must be entered via device before the Outbound rule can be triggered. |
|---|---|
| Trunk Sequence | The Trunk sequence defines the order in which the Trunks in the sequence will be used if one fails or is not reachable. |
System
Network
The network window centralizes system settings regarding Ip network, routing, and connectivity.
The main window has 3 Tabs: Interface, Route and Connectivity and contains a listed panel and a configuration panel.
Interface
Due installation the Ayrix enables a single network interface. It might that you have multiple ethernet Interfaces. In this window you can and edit and change the network interface settings
of all available interfaces. For example: an IP address change without losing your license.
Field description
| Configure interface | |
|---|---|
| Enable Interface | Sets the interface to active state |
| IP address | IP address |
| Netmask | Netmask |
| Gateway | Gateway address |
| DNS | |
| DNS primary | Enter a primary Domain name server address |
| DNS secondary | Enter a secondary domain name server address. |
Housekeeping: As the administrator is logged in via web access. An IP address change might result in locked administrator access. There for a 2^(nd) admin access is useful. Otherwise, a system reset/restart releases the account.
Route
On the Route part you can assign static routing.to enforce traffic to use a different gateway.
| Configure Route | |
|---|---|
| Interface | Select the physical IP network interfaces at your server |
| Network | Add a network Ip address |
| Netmask | Add a netmask |
| Gateway | Add a gateway address |
Connectivity
| Hostname | Enter a fully qualified Hostname. If your Ayrix is hosted pls do not remove the hostname. |
|---|---|
| Extern IP | |
| Static IP or multiple interface | |
| External IP | Select between Static only on one IP or dynamic or multiple interface |
| Dynamic IP or multiple interface | Select between Static only on one IP or dynamic or multiple interface |
| STUN-Server (primary) | Add a STUN-server FQDN or IP address in case you have dynamic or multiple Ip interfaces. |
| Port | Default Port 3478, Access port of the STUN |
| Request Timeout (seconds) |
Language, Region & Time
This Language, Region& Time window centralizes three (“3”) general system functions and contains 3 tabs. 1.) “Languages”, 2.) “Time Zone” and 3.) ” E164 Settings”.
The tab “Languages” lists and installs language packages.
The tab “+ install Language packages” to add additional language packs will become operational in an upcoming release.
Field description
| Languages | Select active language packs for system use. |
|---|---|
| Time Zone | Sets local time of your region and synchronizes the system clock against two NTP servers of your choice. For ex.: 0.centos.pool.ntp.org |
| E 164 Settings | See next table: E164 |
The tab Time Zone, you can set the local time of your country as well.
E164
The tab E164 Settings sets your dialing preferences.
This table is also valid for multiple functions in the Ayrix.
These E164 preferences depend on the country and provider.
Field description
| Country Code | |
|---|---|
| Remove country code if same country | Enables to remove the leading country code if dialed. Send the dialed number in national format. |
| Dial prefix for international calls | The “00” in front of your country code |
| Area code | The “0” in front of your area code |
| Remove area code if same area | Enables to remove the area code, e.g., to send only the local number if your connection is in the same area. |
E164 Numbering scheme explanation.
Your provider only accepts calls with a correct address presentation in an E164 format.
To address calls, the SIP protocol contains a Uniform Resource Identifier (URI) schema.
A SIP address or URI is written in a similar fashion to an e-mail address: number@sip.inum.net.
The number part of the URI is formatted according an E164-formatted number scheme, issued by the iNUM initiative.
That E164 number scheme is a concatenation of:
International prefix symbol (according E123), country code, area code, company prefix and extension number.
For example: sip: +1-999-123-4567@voip-provider.example.net
In the above example: “+” (E123), “1” (country code, without leading zero`s), “999” (area code), “123” company prefix, “4567” (extension number)
Although the E164 format definition, the iNUM Initiative left some recommendations. Most important are:
The length of all these codes varies per country.
The address format can be International, - with or without leading (E123) notation, National or a private number format.
Resuming, depending on the requirements several combinations are possible, However, incorrectness results that calls are rejected.
The E-mail menu is a window to configure e-mail sending on the SMTP server to inform users. The Email module is intent to forward e-mails to a company (internal) mail/exchange server. The E-mail window contains two (“2”) tabs: “Mail Server” and “Email Templates”. The “Mail Server” contains the SMTP server configuration settings.
If you want to receive messages from your Ayrix, for example from your voicemail with its attachment, make sure to configure this module with your SMTP Data.
Mail Server
The mail, or SMPT server is to send, E-mails, for Conference, Extension information, and voicemail attachment to Email recipients. In this window we configure the settings of the SMTP server.
Field description
[TABLE]
E-mail Template
The “Email Templates” window contains a list of predefined e-mail templates for conference invitations. It also contains a configuration panel to create, edit and modify these templates. There are system and custom templates. System templates cannot be removed. For example: templates for a conference invitation.
In the list panel you can see in the column “Modified” if a template was modified.
The content of the templates can be enhanced with XML based key word place holders.
Field description
| Configure email template | Email templates for conference invitations |
|---|---|
| Name | Give your template a suitable name |
| Language | A language identification of the template |
| From | The sender address |
| Subject | Subject title |
| Body | The content that is sent to the recipient. |
XML place holders
To create your own template for a conference invitation you can write with XML place holders. In the Callflow menu –> “Conference” - > tab “Send invitation mail”
These place holders are field collected from the Conference Configuration (see chapter 4.41) and the calendar selection in the preparation template.
The following place holders are available:
Field description
| XML place holder | XML entry | Description |
|---|---|---|
| <br><br> | Name of attendee | |
| {{conference.name}} | Name of Conference Room, from Conference - basic settings | |
| {{conference.pinUser}}. | <b>{{conference.pinUser}}</b><br> | Pin assigned in Conference Room, from Conference - basic settings |
| {{date}} | {{date}}</b><br> | Date entered in the Sent invitation mail preparation window. |
| {{did}} | <b>{{did}}</b> | DIDs that is assigned, from Conference - basic settings |
| {{extension}} | <b>{{extension}}</b> | The extension number the attendee dials in, (Conference - basic settings). |
| {{time}} | <b>{{time}}</b> | Time entered in the Sent invitation mail preparation window |
Console
TFTP Server
The Trivial File Transfer Protocol (TFTP) and FTP server can be used to upload, store, and download files. This TFTP feature is implemented to offer a central storage for related files and a simple up-and download mechanism for extensions.
Files can be downloaded with assistance of a separate DHCP server. A DHCP request is sent on a start-up, or after a reset of the telephone (-client).
To execute a TFTP file download, you need to set DHCP option 66 (IP address of the Ayrix or FQDN) and option 67 (relevant download file) on the DHCP server.
A manual download of files to your local host is possible with the download button (=HTTP/HTTTPS download). To delete the File, select it from the list, click on the “delete” button in the configuration panel.
For example: Telephone book, Firmware etc.
This TFTP can be used to download for example phonebooks to extensions or a reset file to the extensions.
This window has a listed panel and configuration panel.
The listed panel shows you the uploaded files in the TFTP directory, enables you to search for a particular file.
The tab “Add”, enables in the configuration panel to add new files.
Field description
| Upload file to server | Configuration panel |
|---|---|
| Browse | Select local files you want to upload to the TFTP server |
| Save | Save field entry, confirmation of the upload. |
| Body | The content that is sent to the recipient. |
|---|
Notice: TFTP functionality is actual under development. In an upcoming release a full usage of the TFTP server will be available.
Housekeeping: The DHCP is out of scope. However, DHCP option 67 does not necessary mean that only 1 file will be downloaded. This may also contain a place holder, depending on the type of download client (-telephone). They will not only download a file but full directories. Depending the type of DHCP server, it may accept on option 66 also a combination of IP address and file name. So \\IP_adress\file_name.
Backup
The backup feature will become available in one of the upcoming releases
Update
The update feature will become available in one of the upcoming releases
License
 On the License window you get an overview of the used licenses. If a license used up, with the green “add” button you can order additional licenses. The additional license will be shown below the screen.
User Access
If the License module is not restricted by the User Authorisation permission generally, the system user has also access to enhance licences.
That access can be also restricted when the licensed module permission is marked as read only.
Fundamentals:
A short interruption of the connection to the license server has no influence on the functionality of the Ayrix. However, after 72 hours a failed license check the system will be deactivated and taken offline to protect against misuse.
The license is committed to the hardware ID of the CPU and IP address. Please consider that the IP address of the server is not changed anymore.
[Picture License Model Overview]
License server (als.ayrix.ch)
Prices and features are defined and parameterized in the license server
The features are grouped into 3 categories
Instance Features
- Charge per unit (price x quantity)
General Features
- Charge per user (price x user)
Core Features
- Are included in the license
Features can be hidden, so that the end-customer does not see all features
Upgrade packages are configured by the customer on the license server. The seller basically defines which packages the customer can see.
Upgrade Type
Single upgrade
Packages upgrade
- If no packages are defined, the customer cannot upgrade
The license bundle is divided by three (3) different license types:
General features:
These licenses are per created user.in the system.
extension, voicemail, announcement.
Instance licenses
These licenses are for feature functions: They are counted by function, ring group or queue
Core features:
These licenses are needed for general operation features of the PBX. These licenses are included in the license bundle and free of charge.
PBX license replacement:
The PBX license is tied to the system hardware. In case of hardware replacement contact your reseller for a license replacement.
Reboot
In some cases, it is necessary to reboot or shutdown the system. Connections and calls are lost.
Reboot
On a reboot you Reboot the operating system and initialize all Ayrix services. Call waiting queues will be re-initialized. IP address catch with the fail2ban in the BruteForce Protection will be cleared. (Dynamic agents for a Callflow queue will be automatically logged off. They need to logon manually after rebooting the system. The Ayrix PBX returns autonomously to normal operation. Reboot is password protected.
Shutdown
Will shut down and switch off the complete operating system. The shutdown is password protected.
Housekeeping: for example, on an attack, or a lockout
A reboot is just a re-initialization of all Ayrix services.
The BruteForce parameters are stored in the iptables. A reboot does not clear these values.
Troubleshooting
Activity log
Event log
Error log
Help
The Help feature will become available in one of the upcoming releases.
License Error
On an operational Ayrix every 72 hours a license check is executed. The license is based on CPU HW serial, the NIC HW serial number and IP address. A consequence of that mechanism is that an IP address change of the Network Interface card can only be changed via Ayrix web access, menu Network, Tab: Interface.
In a few situations it might happen that the license check fails. The phones remains operational, but web access is locked to the Register/Activate page.
In these cases contact our Customer service Center.
FAQ’s encrypted
Terms
Appendix Firewall
Appendix: Firewall port list
| Default port | Description | IP Protocol | Usage |
|---|---|---|---|
| 21 | FTP Port | TCP | FTP |
| 22 | SSH port 22 | TCP | SSH remote access to the operating system |
| 25 | SMTP Port: 25 | TCP | SMTP, outgoing unencrypted E-mail port |
| 53 | DNS server | UDP / TCP | DNS requests |
| 67, 69 | TFTP Port: 69 | TCP | Trivial file transfer port of the TFTP server |
| 80 | HTTP port | TCP | HTTP web access port |
| 443 | HTTPS port encrypted: 443 | TCP | HTTPS Web access port encrypted |
| 465 | SMTP port 465 SMTPS encrypted: | TCP | SMPTS Email encrypted port for SSL encrypted Email. |
| 554 | Real-Time Streaming Protocol (RTSP) | UDP | Radio streams |
| 587 | SMTP Port 587 TLS encrypted | TCP | SMTP Email port for TLS encryption |
| 1024-5000 | Radio streams | UDP | RTP media streaming port |
| 1167 | Tel. conferences | UDP | Not used by Ayrix |
| 1755 | Microsoft Media Services MMS | TCP | Radio streaming |
| 3478 | SIP STUNNING | TCP | Stunning server that exchanges the IP from private to public address |
| 5038 | TAPI | TCP | TAPI server interface port |
| 5060 | SIP Trunk port | UDP | SIP signaling port |
| 5061 | TLS (STRP) | TCP/UDP | SIP signaling port encrypted |
| HTTP(-S) | TCP | Terminal firmware provisioning port | |
| 6970 - 7170 | Radio streams | UDP | RTP media streaming port |
| 7070 7071 | Radio Streams | TCP | RTP media streaming port |
| 10’000-20’000 | RTP Port | UDP | RTP media streaming port |
| 10’000-20’000 | SRTP Port | UDP | SRTP 4media streaming port |
Housekeeping: Calendar = http/https port
License server = http/https port
SSL request= http/https port
SSH port = Access to the server
Specifications
Minimal hardware requirements
- CPU Family Intel Celeron, Intel i3 and Higher (64 Bit Intel processor)
- Number of vCPU’s 1
- Memory 1 GB
- Storage 20 GB available storage space,
we recommend on a on-premises system to apply a (software) RAID disk -see 1.52 Software RAID configuration.
- Connection Internet connection
Software RAID configuration
We recommend (physical) RAID disk installation for an extended reliability in operational lifetime. Consequently, a software RAID installation is a manual installation process.
1^(st). Bios settings:
In the Bios settings of the system, you must disable the UEFI settings and choose legacy: The Ayrix boot installer is limited to legacy mode.
Select your boot medium and boot priority, USB, or DVD.
2^(nd) Installation procedure:
Start the centos installation, interrupt* the automatic installation process.in the configuration window, by checking and set in the Configuration the Localization items, “Date & Time,” “Language Support”, “keyboard” and “Network &, Hostname”.
In the configuration go to “Installation destination”, to partition the disks.
- De-select the USB memory stick
- Select both physical disks for installation.
- Select the manual partitioning: “I will configure partitioning”
- Press Done, the Manual partitioning window open
*Notice: The installation starts without interruption automatically on a time out.
We recommend the following three partition sizes:
- /boot 512MB
- /swap 2048MB
- /(root) leave “Desired Capacity” empty and press Add mount point. The installer takes the remaining capacity of your disks.
Other mounting partitions left as is.
- Move to the left side and modify ALL three partitions.
- Change the “Device Type:” from “Standard Partition” to: “RAID”,
- Select Raid Level “RAID1”
- Press “Update Settings” to adapt RAID partitioning.
Label and File System, we leave as is.
- Press “Done”,
- A Summary of Changes window opens check and press “Accept Changes””
- Back in the main Configuration menu press “Begin Installation”.
Hardware specifications
Hardware compliance
Ayrix can be deployed as on-premises system or hosted system. Distributors may deliver a customized package of software only or as on-premises soft-and hardware delivery.
We contribute our distributors with the hardware selection. We verify the hardware manufacturing specifications against EU regulations. Swiss regulations are harmonized with the EU regulation standards.
Environmental operation (EU)
In accordance with:
IEC-EN60068-2-2 Dry heat and
IEC-EN60068-2-38 Temperature/humidity/
ISO7779 Noise
Energy efficiency operation of power supply and PC/server
(EU) 2019/424 PC/Server
(EU) 2019/1782 External power supplies
(EU) 617 /2013 Energy Efficiency operation.
In accordance with IEC-EN62301: Measurement of standby power
Electro Magnetic Compliance
In accordance with:
IEC-EN55032:2017_Emission Class A
IEC-EN55035:2017_Immunity
CE safety regulations.
In accordance
IEC-EN63000 :2016 RoHS compliant.
Software specifications:
Operating system of Ayrix.4.1.0.4 installer. Centos 7.7-1908 Kernel v. 3.10.0-1062.el7
Security upgrades (when available) are updated automatically.
| 7.7-1908 | 7.7 | 3.10.0-1062 | 17. Sep. 2019[^(\[35\])](https://de.wikipedia.org/wiki/CentOS#cite_note-CentOS7.7Announcement-35) |
|---|
System performance test.
As well on System performance with a traffic benchmark test. For traditional PBX (TDM) the following test sets are defined. On Traffic volumes measured in Erlang
- Extension to Extension
- Incoming traffic to Extension
- Outgoing traffic to trunk
- Busy hour call attempts
Service Grades
Extension to extension traffic: 1% congestion probability
Incoming line to extension: 1% congestion probability
outgoing line to extension: 1% congestion probability
While in TDM you can measure explicit the failed call (attempts), VoIP performance tests is different.
Voice quality has a correlation to traffic load (rising delays) and dropped packets (with UDP).
Test are executed according:
ITU T-REC-P.564-200711
Conformance testing for voice over IP transmission quality assessment models
ETSI TS 103 222-1 V1.2.1 (2018-03)
Speech and multimedia Transmission Quality (STQ); Reference benchmarking, background traffic profiles and KPIs.
Part 1: Reference benchmarking, background traffic profiles and KPIs for VoIP and FoIP in fixed network
The scope of the defined testing procedures is the evaluation of the network access by VoIP and FoIP fixed-network services.
Guaranteed Operating range
Minimal requirements
Deliverables
Warranty
Ayrix is delivered as a full software product as is. There are no warranties on the correct behavior, nor on its consequences of its use of the product, nor you can complain because of a system failure or outage of operating system and/or application.
Service
To grand the Ayrix operation an internet connection is required. The Ayrix checks every 24 hours if an update is available. The Ayrix will be updated automatically as an update package is available. The operating system will be updated if security patches are available. Updating might result to a reduction of operation or a disruption of operation.
Technical Support
We offer charged support services on the released versions of Ayrix PBX.
The support is at level best effort unless Service level agreements are agreed with a support contract with the supplier or distributor. Contact our customer service at support@ayrix.ch.
On beta releases there is no technical support. In case of a failure sent a bug report form via the bug bounty program on the Ayrix website under: www.ayrix.ch
Lifecycle
No lifecycle statement is given at the release of this product.
CentOS
| {{time}} | Time entered in the Sent invitation mail preparation window |
|---|
End of lifetime Dates (EOL):
| Operating system | CentOS-7 |
|---|---|
| Maintenance Updates[^2] | June 30th, 2024 |
Last updated at 2020-10-24 08:40:14
For a complete specification refer to: https://wiki.centos.org/About/Product. EOL means “End of Life,” or when a version of a product is no longer supported. The definition of ‘no longer supported’ can range from no longer providing security updates, to no longer fixing bugs. It’s important to prepare to upgrade or migrate to newer versions before they become EOL. Fortunately, CentOS version have very long lifecycles, which gives us plenty of time to plan our major version upgrade paths.
Application
Ayrix is a software, developed as closed system. You are hereby granted a limited non-exclusive right to install. The package includes an open-source operating system.
Some modules are forked from open source. See also 16.4 Compliance statement.
Main releases are planned due regular intervals,
Hotfixes do contain only repairs.
Ayrix is available as ISO appliance file.
The ISO template is based on a BIOS based PC model.
Updates of Ayrix will be provided via internet.
Update availability will be checked every 24 hours by the system.
During the Maintenance updates phase, only Security errata and select mission critical bug fixes will be released
Housekeeping: Windows 10/2019 Hyper-V virtualization platform Generation I =Bios)/ Generation II=UEFI.
Compliance statement
Hardware Compliance
Ayris is a software as s service.
If your Ayrix is delivered as hardware, we verified its operation against the hardware standards mentioned in the chapter hardware specification.
Software Compliance
Ayrix, model, number, serial number
This software complies Innovation, science and economic development standards following two conditions: by compliance and copyrights & license rights.
Copyrights and License
Several pieces of free and open-source software have helped Ayrix to where it is today
A few require that we include their license agreements within our product. There for we publish the license terms of these modules.
Ayrix is a closed source project. The binary will be published as an all- inclusive distribution package.
CentOS Linux 7 EULA
CentOS Linux 7 comes with no guarantees or warranties of any sorts, either written or implied. The Distribution is released as GPLv2. Individual packages in the distribution come with their own licenses.
For a full context of Centos legal notices and licensing policy visit: https://centos.org/legal/
Digium Asterisk:
Some modules are forked from Asterisk. Asterisk provides developers with a free, open-source framework that simplifies the process of building communications systems. Digium has continued to sponsor Asterisk as an open source project since 1999, distributing it under the terms of the GNU GPL v2 license. For a full context of asterisk License agreement:
https://store.digium.com/view_agreement.php?id=4 Copyright OpenSSL [YEAR]
Fail2ban:
Fail2Ban is free software; you can redistribute it and/or modify it under the terms of the GNU General Public License as published by the Free Software Foundation; either version 2 of the License, or (at your option) any later version.
Fail2Ban is distributed in the hope that it will be useful, but WITHOUT ANY WARRANTY, without even the implied warranty of MERCHANTABILITY or FITNESS FOR A PARTICULAR PURPOSE. See the GNU General Public License for more details.
Mod-pike:
kamailio5-mod-pike. Kamailio is released under GNU Public License v2 (GPLv2). Beginning with 3.0.0, the application includes parts of code under BSD license that can be used such as individual components. See: https://www.kamailio.org/w/info/
Openssl:
Contents licensed under the terms of the OpenSSL license.
See https://www.openssl.org/source/license.html for details
Maxmind:
https://www.maxmind.com/en/end-user-license-agreement?sign=1
MaxMind End-User License (December 3, 2019)
Copyright of this manual:
Nothing from this manual may be duplicated or distributed without the prior author's permission.
Notes:
- The license is generated once. As the UUID of the PBX can be always requested,
There is no need to save the license.
- The number of extensions can be enhanced in the PABX itself. (or by Customer Support), It does not need any license update.
Thanks to
We would like to thank the team of author, co-authors, reviewers, graphic designer, and coordinator, for their contribution to create and completing this manual.
Author: Daniel Maier,. Etienne Stoffels
and our Customer Service
If you have any questions or suggestions regarding this manual, please write to the support team: support@Ayrix.ch
Appendix:
Feature Code list
There are read only feature codes, these fixed codes are not listed in the feature code list.
*8 = general call pickup
*8<number> = individual call pickup
*81 = pickup by rank
*55 = Agent spying: tapping or listening-in on an active party. For ex. Supervisors who checks the business quality of call Centre agents.
“[1..7.9] = enable/disable calendar entries
Icons fontawesome (INTERNAL)
 | Inbound | |
|---|---|---|
 | InboundOutbound | |
 | Extension/Fax Extension | |
 | Emergency Numbers | |
 | Security | |
 | Fax | |
 | Ringgroup | |
 | Conferece | |
 | Queue | |
 | Time Condition | |
 | Callflow | |
 | Hold | |
 | Intercom | |
 | Day/Night | |
 | BruteForce Protection | |
 | TFTP Server/Routing | |
 | Routing | |
 | Records | |
 | Announcements | |
 | Network | |
 | IVR | |
 | PBX/Fax Server | |
 | Transfer Callback | |
 | Speed Dialing | |
 | Global VocieBox | |
 | Geo CID | |
 | Feature Code | |
 | Dashboard | |
 | Global VoiceBox | |
 | SSL | |
 | Pinset/User Authorization | |
 | System | |
 | ||
 | Geo Restrictions | |
 | Reboot | |
 | Trunk | |
 | Music on Hold | |
 | Phone Book | |
 | Number Blacklist | |
 | Language & Region | |
 | License | |
| TAPI |